This is called Linear Workflow . . . I'll give you the most simple version (and hope that I don't get that too wrong).
Basically, the gist is this. When you're working in Maya (or most other 3d apps), the math that makes the images works in something called "linear" space. Okay . . . The problem comes from the fact that the images you're used to looking at generally come "corrected" or "adjusted", NOT in "linear" space. This is to compensate for the way computer monitors and tvs treat light vs. the way your eye see light. You've probably seen this idea either in calibrating your monitor or in a Photoshop image that's missing some info. The common space for monitor's correction is called sRBG (again you may have seen this term somewhere on your computer). Digital cameras and web photos, etc are usually all gamma corrected to sRGB (a value of 2.2), so they look correct to your eye. This gamma is basically the relationship of lights to darks (it's the center point slider in the levels control of photoshop). Correcting gamma to sRGB looks like it makes the image lighter, but it's actually more complex. It's really changing the gradient from dark to light. The blacks are still black and the whites are still white, but the stuff in the middle shifts brighter (sRGB or gamma 2.2) or darker (linear or gamma 1.0) to the eye. This comes into to play mostly when you're trying to render realistic images in a 3D program. Things don't work quite right.
So here's the basic, simplified deal (I'll show an example in one second).
- the program works and renders linear images (hence "linear workflow")
- to look correct, images must be gamma corrected
- therefore, you should be gamma correcting your output images when you render in 3d
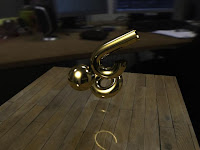
I set up a scene with a few objects, each with an mia material and create an HDR environment. Here's what I get straight out of the box:
 (click images for larger)
This is supposed to be correct, but when compared with what I think it should look like (based on the HDRI file), it's DARK.
Typically, one would just crank up the influence of the env HDRI or add some lights. But you shouldn't have to . . . that's the problem. Furthermore, the image is actually only too dark in the darker parts. That's because this image is LINEAR, and thus looks funny on your monitor. There is only one element of this image that actually matches what one would expect. That's the wooden floor. That's because this TIF file has already been gamma encoded (I know because it looks right in Preview, as I said most normal images are already gamma encoded). So Maya takes what you give it and computes and renders out in linear(dark) space.
To properly light and render this image, there are two steps (at it's most basic level):
- I'll de-gamma my textures. This will make EVERYTHING in plain old linear space up until we hit the camera.
- Then I'll add a gamma correction to the camera lens. Everything that then renders will be properly gamma corrected.
Here's how I fixed the image above.
The first step is to "de-gamma" my texture file (the wood). Here's how. You should stick a Gamma Correct node in between the texture file and the material. Then connect the outColor of the image into the value of the Gamma Correct. Then change the "gamma" value of the correct node to 0.455 in all channels. This is to "de-gamma" the image (.45 is the inverse of the sRGB gamma, i.e. 1/2.2). Don't worry too much. 2.2 and 0.455 are really the only two numbers you need to know.

Repeat this step on every texture file you have. (there are other approaches, but this is the simplest.)
This is the image that you get now:

You'll notice that the only real difference is that the wood is actually darker. That was exactly the point. We want everything on the same page, the same working color space, in this case, linear. The image was looking dark and now the wood is equally as dark, because we removed the gamma correction that was built into the texture. Now we can add correction back (to sRGB) and the wood texture won't be brighter than the rest of the image. Got it?
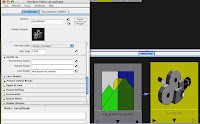
Now let's add that correction back, this time onto the camera itself. Select the render cam and open it's attribute editor. Twirl down the "mental ray" tab and we're looking for the "lens shader" slot.

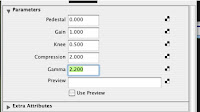
Click on the checker box of the "lens shader" slot and add (from the MR list) an mia_exposure_simple node (you could also use the photographic version of the exposure, but simple works fine for now). Open it's attributes and change the gamma to 2.2. (some people seem to like the look of 1.8 better, but that's a seperate issue). This is correcting to sRGB (the way you normally see images).

So anything this camera renders will get a gamma of 2.2 added (which is why we had to remove the gamma from the texture file, otherwise we'd double it up). Since everything in our scene has been working in linear space, the image should look much more like one would expect a photograph of our scene to look.
Here's the image with gamma correction.

The image is much "brighter" and softer. The brightness is actually all in the midtones. The white parts and the black parts are all the same, just the gamma has changed. Adding the sRGB gamma makes the physical properties of the image behave much more like a photograph to our eyes, which was the point. The wood is now in line with the rest of the image, as well, unlike our first pass. And I never touched a light or any other setting save the gammas!
So in short, there are two things to do for the basics:
1. remove gamma corrections from your texture files
2. add gamma correction to your camera for the renders.
whew.
NOTE: These images were rendered in preview quality and took about 5 seconds each. There was no retouching or anything at all.
One could easily work in this mode then remove the gamma (switch the gamma back to 1.0) and render to float images for later gamma correcting in a comping program, or use different workflows entirely, but this was the easiest way for me to understand this.
NEW NOTE (thanks andrew, from 3dlight): You can also adjust the gamma at the framebuffer in mental ray render globals, but this works inversely (to add gamma of 2.2 (make the image lighter), you would have to change the setting to 0.455). In that case, you would not need to add all of the gamma correct nodes to your textures, it would correct those all for you, but you would need to turn your lens shader gamma back to 1.0. There is some difference in terms of what happens depending on whether your textures and/or output are float or LDR, but I'll leave that be for now. You can certainly get better info on that from the links below.
Some good posts for more about this stuff are:
http://3dlight.blogspot.com/2008/09/linear-workflow-for-maya-mental-ray.html
http://www.djx.com.au/blog/2008/09/13/linear-workflow-and-gamma/
http://www.floze.org/2008/07/six-tuts-on-light-and-shade-part-i.html
You have explained it very well - better than me that's for sure.
ReplyDeleteThe frameBuffer gamma actually has an effect on the color math when blending colors (ie multipixel filtering) which is similar to the difference between working in 8 bit and a 32 bit float in photoshop. In my tests I found the frameBufferGamma=0.455 gave more pleasing results.
--djx