Good question! (Actually, a reader, BMDela, asked me this. . . so I'm only partially taking credit)
The question was posed thusly:
"""
So, I've been looking for an answer to this question everywhere, and can't seem to find it.
At what point do materials/shaders enter the equation?
Do you put the materials on the master character/props/set, then reference the shaded character into the animation scene?
What's a good workflow for implementing a shading network?
"""
The correct answer is . . . wait for it. . . "It depends!"
Lame, I know, but it's the truth. There are ways to do things that are more 'pipeline' correct and ways that are a bit more user friendly. Some projects work better one way, some the other. So let's look at the two basic ways of doing things. . .
1. Adding shaders to the master files (let's say to the master model files):
Doing this is basically putting your shaders (and their assignment to surfaces) at the front of the pipeline. That is to say, you make your models, uv and texture them completely, then pass them on to rigging, etc. This would seem to be the easiest way to do things and sometimes it is. What are the pros/cons?
PROS: the texture artist only has to apply the shaders once (in theory) no matter how big the show is. Let's say you have a show with 3 characters. The texture artist hits each one and then it doesn't matter whether there are 5 shots or 500, it's the same amount of work for those characters (unless there are changes, which may or may not be a pain in the butt).
CONS: There can definitely be issues with the fact that now all of your shaders are referenced (until you get to the very end of the pipeline). . . but the main problem here is that in heavier scenes you're always pushing around all the textures. When I was animating recently on Skylanders 2, some of the scenes took 3-4 minutes to load, mostly because of the massive amounts of texture files we had to pull over the network. Let's say, as an animation lead touching a lot of shots, I open 20 shots/day. If each shot takes 1 extra minute to load, that's 20 minutes/day. There are 10 leads opening that many shots, so that's 200 min/day to pull textures (that's not counting the 20 other animators who may open 5 shots/day). So over one month, just the animation leads spend ~4000 minutes (or 60+ hours) JUST TO OPEN SHOTS! That's a lot of time/money. And it's not a crazy scenario depending on the shots/network/etc. Might even be conservative . . .
2. The alternative is to push the texturing until closer to the end of the pipeline (after animation):
To be clear here, I'm not saying "don't create your textures until the end", I'm saying "don't assign your textures to the models until the end". So the texture artists would do the same thing as above, they'd just do it "offline" or in files that don't get pushed through rigging and animation. They would then export those textures into appropriate files that just have the textures in them. Then once things are animated, you can just import those textures and assign them to correct objects. Usually you'd want some textures in the master files, things like eyes and stuff that's involved with the rig, and maybe even apply basic color shaders so people can see what's up, but the heavy stuff stays out until after the animators are done.
PROS: Obviously the point here is that you don't have to push around hundred's of MB's of textures for each shot. Work can go much faster down the pipeline. You also avoid the annoying "doubling" of textures (if I reference 5 of the same plants, I end up with 5 copies of the same shader in my scene). You just import what's necessary. You're also doing the final assignments in context so you're making any fixes while you're actually in the scene.
CONS: Mainly that the work scales linearly. So more shots, more work. You can also get some surprises if you haven't seen the textures in action, and you'll see them with less time to fix them.
So the reality is that it depends . . . how heavy are your shots likely to be? How many of them are there? Are the textures integral to the animation or can the shots be animated without them? How rigorous is your pipeline? All theses questions will dictate which is the right way to go!
I've actually been pondering on scripting a system to keep track of what shader is applied to what mesh, etc so the texture artist could save out a file that would reapply the shaders later on down the pipeline automatically. Haven't gotten around to it yet. . . Does anything like this exist? (non-proprietary, obviously)
Anyways, hope that was helpful, let me know if there are any clever things I've missed!
Monday, October 01, 2012
Wednesday, August 15, 2012
Space Switching and Space Matching
I created a couple of new videos to talk about space switching and space matching. I think they're pretty self-explanatory, just going over the basics of what they are and some ways to set them up. Nothing too crazy, though the space matching one is a fair amount of python scripting (though again, nothing terribly hard if you're already using python).
But if you're into the more complicated bits, here are some links to info about them:
Charles Looker - http://charleslooker.wordpress.com/2012/02/25/multi-directional-constraints/
Hamish McKenzie - http://www.macaronikazoo.com/?page_id=413 (very illustrative, but be warned, some of his matrix math stuff used his own scripts to deal with the matrices, so it can be a bit confusing if you try to do it without installing his scripts first. But the principles are the same, I just use the API to do the matrix-y bits, which can be hella confusing in it's own right)
TD Matt - http://td-matt.blogspot.com/2010/12/broken-hierarchy-rig-and-space.html
Oh yeah, and the vids by Jeremy Ernst are here: https://vimeo.com/jernst. Good stuff!
And I'll say it just so you don't have to. . . My god am I long winded! Not sure how explaining space switching could possibly take that long. But what can you do? :)
Maya/Rigging: The basics of space switching from zeth willie on Vimeo.
Maya/Rigging: Space Matching from zeth willie on Vimeo.
Friday, July 13, 2012
Question about tranforms on a frozen object. . .
A fella named Jason emailed me at Vimeo with a question about the IK 2 FK snapping video I did (here):
"I'm a student over at rigging dojo and my mentor turned me towrds your ik fk snapping tool that you created. The script works great. But I would ask how do you handle ctrl curves when they have been say zeroed out at (5,5,5) but when I query there position i get back (0,0,0) and when i apply the proper cordinates to the ctrl curve it goes the right amount but because it was zeroed out it isn't right... Any help would be appreciated"
Thought it was a good question (as I would expect from Rigging Dojo!) and thought it was worth talking about for two reasons: 1) the problem/solution are kind of interesting (if you're into this kinda thing) and 2) it reinforces some stuff I've said in the past, which bears repeating. Namely, you're kinda doing it wrong.
{slight digression (would make it footnote if knew how). . . When I say "wrong" here I'm using the term loosely. That is, you may have valid reasons for doing whatever you're doing and in your case it may make sense, BUT in most ordinary circumstances, you're probably creating more trouble than you're saving. end of digression}
So second things first . . . What is "wrong" and why?:
It has to do with freezing your transforms. And THAT has to do with the Matrix ("whooa . . ."). Each object has a transformation matrix that basically keeps track of where the object is in space, how it's rotated, scaled, etc. I won't make a fool out of you and me by trying to explain it in detail (Hamish Mckenzie has some cool posts on his blog about it), cuz I don't know it that well. But what happens, more or less, when you freeze transforms is that you "reset" the objects matrix (or perhaps more accurately, offset the matrix) and tell it that where it is NOW is at 0, 0, 0. In the ordinary course of events, that may work, but when you come in with your cheeky little scripts and try to tell it to go somewhere specific, as you've discovered, there's a problem and Maya doesn't know what you mean (or again, to be more precise, Maya knows exactly what's going on, YOU don't know what you mean, or least I don't).
So that's what I mean when I say you're doing it wrong. Freezing transforms on controls is usually NOT the best way to zero them out. A much better way is to "group orient" them (some people call it "group freezing"). I even did a post and a video on the process. In short, you create your control at 0,0,0 and immediately group it. Then take the group and move THAT to the correct location + orientation, either with constraints that you then delete or better yet with "xform" and math and scripts and such. But you get two nice benefits: 1) the control stays at 0,0,0 because it's parented under the group that's doing all the moving and 2) because the control's matrix is then inheriting it's information from the group (which DOES have all the correct info with no offsets), both you and Maya are talking about the same world space, etc. and things like "xform" and "move" and stuff should work fine.
Sooooo. . . what if (as I imagine is the case) you've already done the freezing on your control and don't want to go back. Can you still use the IK2FK python code? The answer is "yes" (though I would recommend fixing the control using group orienting and being done with it. . .).
There are actually a few ways I would imagine. I read somewhere once that Maya stores the freeze transform offset matrix somewhere. I also bet that there's some way to get all smartypants and mathy and solve the problem by busting out some matrix voodoo. But since I can't do that (yet?), I can only offer a solution that will solve the translate problem the same way we did the rest of the script, with a lil elbow grease and vector math. It's not that hard:
Basically, the trick is to find the world space position of the IK control. If you just xform the transform node (the object), it obviously returns a weird value cuz the matrix has been offset. So instead, you need to do something like:
So all we're doing is figuring out the difference between the world space of the ik ctrl (trueIK) and the values the maya is giving us for the frozen transform (frozenIK) and applying that difference to the fk wrist position to get the final destination of the ik ctrl. This should also work when you HAVEN'T frozen the transforms (since the offset would then be 0).
Whew. Hope that makes sense ...
"I'm a student over at rigging dojo and my mentor turned me towrds your ik fk snapping tool that you created. The script works great. But I would ask how do you handle ctrl curves when they have been say zeroed out at (5,5,5) but when I query there position i get back (0,0,0) and when i apply the proper cordinates to the ctrl curve it goes the right amount but because it was zeroed out it isn't right... Any help would be appreciated"
Thought it was a good question (as I would expect from Rigging Dojo!) and thought it was worth talking about for two reasons: 1) the problem/solution are kind of interesting (if you're into this kinda thing) and 2) it reinforces some stuff I've said in the past, which bears repeating. Namely, you're kinda doing it wrong.
{slight digression (would make it footnote if knew how). . . When I say "wrong" here I'm using the term loosely. That is, you may have valid reasons for doing whatever you're doing and in your case it may make sense, BUT in most ordinary circumstances, you're probably creating more trouble than you're saving. end of digression}
So second things first . . . What is "wrong" and why?:
It has to do with freezing your transforms. And THAT has to do with the Matrix ("whooa . . ."). Each object has a transformation matrix that basically keeps track of where the object is in space, how it's rotated, scaled, etc. I won't make a fool out of you and me by trying to explain it in detail (Hamish Mckenzie has some cool posts on his blog about it), cuz I don't know it that well. But what happens, more or less, when you freeze transforms is that you "reset" the objects matrix (or perhaps more accurately, offset the matrix) and tell it that where it is NOW is at 0, 0, 0. In the ordinary course of events, that may work, but when you come in with your cheeky little scripts and try to tell it to go somewhere specific, as you've discovered, there's a problem and Maya doesn't know what you mean (or again, to be more precise, Maya knows exactly what's going on, YOU don't know what you mean, or least I don't).
So that's what I mean when I say you're doing it wrong. Freezing transforms on controls is usually NOT the best way to zero them out. A much better way is to "group orient" them (some people call it "group freezing"). I even did a post and a video on the process. In short, you create your control at 0,0,0 and immediately group it. Then take the group and move THAT to the correct location + orientation, either with constraints that you then delete or better yet with "xform" and math and scripts and such. But you get two nice benefits: 1) the control stays at 0,0,0 because it's parented under the group that's doing all the moving and 2) because the control's matrix is then inheriting it's information from the group (which DOES have all the correct info with no offsets), both you and Maya are talking about the same world space, etc. and things like "xform" and "move" and stuff should work fine.
Sooooo. . . what if (as I imagine is the case) you've already done the freezing on your control and don't want to go back. Can you still use the IK2FK python code? The answer is "yes" (though I would recommend fixing the control using group orienting and being done with it. . .).
There are actually a few ways I would imagine. I read somewhere once that Maya stores the freeze transform offset matrix somewhere. I also bet that there's some way to get all smartypants and mathy and solve the problem by busting out some matrix voodoo. But since I can't do that (yet?), I can only offer a solution that will solve the translate problem the same way we did the rest of the script, with a lil elbow grease and vector math. It's not that hard:
Basically, the trick is to find the world space position of the IK control. If you just xform the transform node (the object), it obviously returns a weird value cuz the matrix has been offset. So instead, you need to do something like:
cmds.xform(ctrlName, q=True, rp=True)
which will instead use something that's not part of the matrix business (rp is for the rotate pivot point). This will give you the world space of the object. When you compare THAT to the actual value you get from "xform" of the control, it gives you how far "off" you are from Maya's interpretation of the location. You now just need to know where to move it to, and since you've got the offset value, you just need to subtract THAT from the location of the FK ctrl to get the number you'd need to move the transform of the IK ctl. So putting those together and assuming everything else in the script is the same, the section where you move the IK wrist would look like this:#snap IK ctrl to wrist position
trueIKraw = cmds.xform(ikWrist, ws=True, q=True, rp=True) #get IK pos in true ws
trueIK = om.MVector(trueIKraw[0], trueIKraw[1],trueIKraw[2]) #make it a vector
frozenIKraw = cmds.xform(ikWrist, q=True, t=True) #get IK pos via matrix
frozenIK = om.MVector(frozenIKraw[0], frozenIKraw[1],frozenIKraw[2]) #make vector
offset = trueIK - frozenIK #get the offset value for the Ik ctrl
correctedFw = fw - offset #this modifies the fk pos to account for the offset
cmds.move(correctedFw.x, correctedFw.y, correctedFw.z, ikWrist, ws=True)
So all we're doing is figuring out the difference between the world space of the ik ctrl (trueIK) and the values the maya is giving us for the frozen transform (frozenIK) and applying that difference to the fk wrist position to get the final destination of the ik ctrl. This should also work when you HAVEN'T frozen the transforms (since the offset would then be 0).
Whew. Hope that makes sense ...
Thursday, July 12, 2012
Script for creating/editing message attrs . . .
I know I mentioned it in the 3rd part of the IK/FK snapping videos, so here it is for those of you who might be inclined to use it, the message mapping script . . .
If you're not sure what I'm talking about re: message attrs, watch this or look it up, sucka.
Here it is! zbw_messageMapper or go to the Downloads page above. . .
There are 2 tabs here:
 The first tab is for creating message attributes.
Select the object you want to add the message attrs to (the "base object") and click the "choose object" button to add it to the text field.
Click "add new attrs" to create a row that will allow you to type in the attr name and select the object the you want to send a message to that attr. You can do multiple attrs at a time, btw. If you want to delete the last row you created, click the red button (this just deletes the UI part, not any attrs). Once you've got what you need entered, then click the green button and the magic will happen. (it's really boring magic). A bit of text will pop up letting you know what you've got has been added and any problems or warnings should show up in your script editor. It will also run down what attr have been connected to what in the script editor.
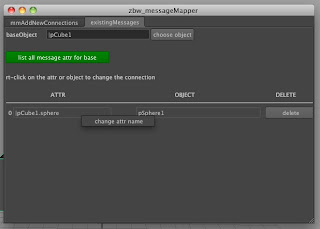 The second tab is reviewing what message attrs you have on your selected base obj.
Select your base the same way you did in the last tab and click "list all message attrs". Any attributes of type "message" (however they were created) will be listed below in columns, one for the attr, one for the connected obj, if any, and a delete button.
The delete button is obvious, I hope, but if you right click on either of the other two columns you'll get a little menu giving you the option to change the name of the attr or change the obj connected to that attr. Clicking on either will open up a little window that gives you opportunity to change the respective end of the connection (and obviously reconnect things when done).
That's about it. I taken care of most of the dummy checking here (i.e. what happens when there are no message attrs or when you leave a field empty, etc), but there may be some situation that spits out an error or something. Be aware that creation side will force connect things, so it will overwrite any attrs that have the same name. It will show this warning in the script editor (though it just does anyways. Ha!). It will also show a little text message in the main window once you've created the messages, which will disappear when you change base objs. I chose not to reset the fields back to empty in case you wanted to do multiple base obj with the same attrs.
Hope it's useful to someone. And let me know if there are any big problems. I may try to fix them, you never know.
To run it, put it into your python scripts folder (maya doesn't automatically read all scripts folders for python files) and type:
You can drag that code to your shelf and run it from a button there.
If you're not sure what I'm talking about re: message attrs, watch this or look it up, sucka.
Here it is! zbw_messageMapper or go to the Downloads page above. . .
There are 2 tabs here:

Select the object you want to add the message attrs to (the "base object") and click the "choose object" button to add it to the text field.
Click "add new attrs" to create a row that will allow you to type in the attr name and select the object the you want to send a message to that attr. You can do multiple attrs at a time, btw. If you want to delete the last row you created, click the red button (this just deletes the UI part, not any attrs). Once you've got what you need entered, then click the green button and the magic will happen. (it's really boring magic). A bit of text will pop up letting you know what you've got has been added and any problems or warnings should show up in your script editor. It will also run down what attr have been connected to what in the script editor.

Select your base the same way you did in the last tab and click "list all message attrs". Any attributes of type "message" (however they were created) will be listed below in columns, one for the attr, one for the connected obj, if any, and a delete button.
The delete button is obvious, I hope, but if you right click on either of the other two columns you'll get a little menu giving you the option to change the name of the attr or change the obj connected to that attr. Clicking on either will open up a little window that gives you opportunity to change the respective end of the connection (and obviously reconnect things when done).
That's about it. I taken care of most of the dummy checking here (i.e. what happens when there are no message attrs or when you leave a field empty, etc), but there may be some situation that spits out an error or something. Be aware that creation side will force connect things, so it will overwrite any attrs that have the same name. It will show this warning in the script editor (though it just does anyways. Ha!). It will also show a little text message in the main window once you've created the messages, which will disappear when you change base objs. I chose not to reset the fields back to empty in case you wanted to do multiple base obj with the same attrs.
Hope it's useful to someone. And let me know if there are any big problems. I may try to fix them, you never know.
To run it, put it into your python scripts folder (maya doesn't automatically read all scripts folders for python files) and type:
import zbw_messageMapper

zbw_messageMapper.messageMapper()
You can drag that code to your shelf and run it from a button there.
Tuesday, July 03, 2012
IK to FK snapping
These videos are about how you might approach and execute IK to FK snapping. (For those that don't know or use different terminology, that's where you run a script and it snaps your IK limb position to your FK limb position). It's something that I had always looked at as a bit of luxury, something to get to if there was time when building a rig (hint: there rarely was time). As I mention in the video, Michael Cawood pointed out to me that it is actually a time saver when you're doing a lot of quick blocking. If you pose your characters in IK mode in blocking, you have a lot less counter animation to do when you change the body rotations, for example. You can pose away in IK, then switch to FK when it comes time to animate (if you need to switch, that is). As I was one of the lead animators on that job with Michael, not a rigger (thank god, there were 50+ characters for that one), I didn't bother to offer up my services:) But I thought it would be a good topic for a video tute, so here it is. . .
There are 3 parts. 1) covers the basic idea and some rudimentary vector math 2) covers the python scipting of those concepts in Maya and 3) introduces "message attributes" which are nifty little attrs that can be really useful to bump up functionality of your rigs/scripts.
Maya/Rigging: IK to FK snapping, part 1 from zeth willie on Vimeo.
Maya/Rigging: IK to FK snapping, part 2 from zeth willie on Vimeo.
Maya/Rigging: IK to FK snapping, part 3 from zeth willie on Vimeo.
Oh, yeah. Here is the code for the basic version of the IK/FK script in python (the script using the message attrs will depend on your specific attr names):
Once I get the little things hammered out in the zbw_messageMapper script that I showed in the video, I'll post that up too. . .
EDIT: One more thing! Here's the link to Ryan Trowbridge's site. http://www.rtrowbridge.com/blog/ Not sure how to access individual posts, but the post from March 09 has the video of the MasterClass on Vector Math in Maya. Good stuff. Also just bought his book on Python for Games and Film. Can't wait to read it!
There are 3 parts. 1) covers the basic idea and some rudimentary vector math 2) covers the python scipting of those concepts in Maya and 3) introduces "message attributes" which are nifty little attrs that can be really useful to bump up functionality of your rigs/scripts.
Maya/Rigging: IK to FK snapping, part 1 from zeth willie on Vimeo.
Maya/Rigging: IK to FK snapping, part 2 from zeth willie on Vimeo.
Maya/Rigging: IK to FK snapping, part 3 from zeth willie on Vimeo.
Oh, yeah. Here is the code for the basic version of the IK/FK script in python (the script using the message attrs will depend on your specific attr names):
import maya.cmds as cmds
import maya.OpenMaya as om

#select the joints we need
sel = cmds.ls(sl=True)

#assign selection
fkWrist = sel[0]
fkShldr = sel[1]
fkElbow = sel[2]
ikWrist = sel[3]
ikPv = sel[4]

#get positions from fk
fkwRaw = cmds.xform(fkwrist, ws=True, q=True, t=True)
fkwPos = om.MVector(fkwRaw[0], fkwRaw[1], fkwRaw[2])

fkeRaw = cmds.xform(fkelbow, ws=True, q=True, t=True)
fkePos = om.MVector(fkeRaw[0], fkeRaw[1], fkeRaw[2])

fksRaw = cmds.xform(fkshldr, ws=True, q=True, t=True)
fksPos = om.MVector(fksRaw[0], fksRaw[1], fksRaw[2])

#set position of IK wrist ctrl
cmds.move(fkwPos.x, fkwPos.y, fkwPos.z, ikwrist)

#start figuring out pole vector pos

#find avg (midpoint) of shoulder and wrist
midpoint = (fkwPos + fksPos) / 2

#find pv direction
pvOrigin = fkePos - midpoint

#extend that length
pvRaw = pvOrigin * 2


#position pvRaw at midpoint
pvPos = pvRaw + midpoint

#stick pole vector at pvPos
cmds.move(pvPos.x, pvPos.y, pvPos.z, ikpv)
Once I get the little things hammered out in the zbw_messageMapper script that I showed in the video, I'll post that up too. . .
EDIT: One more thing! Here's the link to Ryan Trowbridge's site. http://www.rtrowbridge.com/blog/ Not sure how to access individual posts, but the post from March 09 has the video of the MasterClass on Vector Math in Maya. Good stuff. Also just bought his book on Python for Games and Film. Can't wait to read it!
Thursday, June 28, 2012
Follow up on getting work . . .
What this guys says:
http://effectscorner.blogspot.com/2012/06/getting-visual-effects-job.html#.T-zE3nAmZG-
How come he says it and it sounds smart and I say it and it comes out all curse words and aggressive?
. . .
F*&k him.
BTW, Scott Squires is seriously legit. Great blog too.
http://effectscorner.blogspot.com/2012/06/getting-visual-effects-job.html#.T-zE3nAmZG-
How come he says it and it sounds smart and I say it and it comes out all curse words and aggressive?
. . .
F*&k him.
BTW, Scott Squires is seriously legit. Great blog too.
Friday, June 15, 2012
transfer UV's follow up . . .
A little while ago Nasheet posted a comment about solving some of the issues people were having with the transferUV script I posted here:
"""
It worked well for most of the meshes in my scene, but I did get the same error as teezy5 for a couple of them, and I think I found a solution. The error was thrown from:
`getAttr ($targetOrig+".intermediateObject")`;
The problem in my case was that there was more than one object named '$targetOrig' in my scene, and thus the return value of the 'getAttr' was an int[] containing the intermediateObject values for all matching objects, instead of just an int. In order to only get the unique intermediateObject for the selected geometry, 'listRelatives' needs to return the full dagpath. Basically, I just changed the line:
string $targetShapes[] = `listRelatives-s $target`;
to
string $targetShapes[] = `listRelatives-s -f $target`;
And it worked. That's it! Thank you again!
"""
Haven't had a chance to play with it, but sounds right to me. . .
Thanks Nasheet!
Here's the fixed script: zbw_cleanTransferUV.mel
"""
It worked well for most of the meshes in my scene, but I did get the same error as teezy5 for a couple of them, and I think I found a solution. The error was thrown from:
`getAttr ($targetOrig+".intermediateObject")`;
The problem in my case was that there was more than one object named '$targetOrig' in my scene, and thus the return value of the 'getAttr' was an int[] containing the intermediateObject values for all matching objects, instead of just an int. In order to only get the unique intermediateObject for the selected geometry, 'listRelatives' needs to return the full dagpath. Basically, I just changed the line:
string $targetShapes[] = `listRelatives-s $target`;
to
string $targetShapes[] = `listRelatives-s -f $target`;
And it worked. That's it! Thank you again!
"""
Haven't had a chance to play with it, but sounds right to me. . .
Thanks Nasheet!
Here's the fixed script: zbw_cleanTransferUV.mel
Thursday, May 10, 2012
Autoswim-fish-expressions follow up . . .
A couple of months ago I had someone (Patrice Berube) e-mail me a question about some of the behavior in the autoswim fish rig. Been pretty busy with work and all so never got around to posting about the issue . . .
Basically, the problem was when one animated the frequency of the swimming fish (whole or part), over the frames where the animation occurs the sine wave function would freak out, go super fast, super slow, backwards, etc.
Since the rig was made remotely for a studio, I never really got a chance to play with it too much once I made it and no one ever brought up the issue (I actually knew more or less what the animation would be, and animating the frequency never really entered into it. I also suspect that a lot of the animation was done on the FK controls). But once Patrice pointed out what the issue he was having, the problem became more clear.
Essentially, through all of the expressions and such, time was constant (or moving constantly), but changing the frequency as time progressed would give kind of random values as you passed through the progression of frames (essentially, the sin values no longer had any sensible relationship to the values from the previous frame). My first reaction was, "uh oh! This will take some of that crazy math stuff to solve". But as we batted around a couple of emails about, we both kind of arrived at a similar solutions that were a bit more palatable (though I'd still like to know a math-y solution, I can't be bothered at this point).
Here's the problem illustrated:

As you can see, the values that are coming out of the sine function (which is the basis for the joint rotation) are fine if you don't animate the freq. Predictable values, each frame (in this case) changing by a value of 1 in oscillating directions.
But when you animate the freq it looks like it should make sense, but the values kind of suck. Starts out fine (delta of 1. Look I'm using mathy terms!), but then the changes become really unpredictable, sometimes almost 2, sometimes about zero. So the animation would look crazy.
As it turns out the solution Patrice and I both realized independently (with Patrice actually implementing it, rather than just thinking about it :) is that rather than getting hard-core on the math, you could simply take the constant time out of the equation and not worry so much about animating the frequency. Instead, if you create an attribute to take the place of time (I thought to call it "time", he thought to call it "swimspeed". His is better) and simply animate that to make your fish swim, it would solve the problem. So in your expressions you'd simply replace "frame" with $swimspeed (which pulls the value of that attr), you could speed up or slow down the sine wave without fussing with the global frequency. A linear curve for "swimspeed" equals some version of normal time and messing with that curve will give you faster or slower time (as far as the fish rig is concerned).
Note that you'd still have problems if you tried to animate the frequency of the individual controls (because those frequencies would be animated relative to the new "swimspeed" attr). But that's less of an issue. You can just set those frequencies to be whatever you'd like, per control and control the rest of the animation globally.
Hope that helps anyone having this issue and big thanks to Patrice for pointing it out and working through the problem!
Saturday, March 31, 2012
holds and stuff
Had a former student (and colleague!) ask me about some of the in/outs of the business side of things, as he was transitioning from full-time to freelance. The basic questions were: what can I do to turn holds into jobs? Are recruiters worth the time? What about Employer of Record places vs. SCorp/LLC for billing and taxes?
Seemed like useful info to put out there generally, so here's (approximately) what I replied:
"""
re: holds . . .
There's probably not much you can do about this. There are loads of reasons shops hold you rather than book. Most of the time they're feeling out people's availability before the client commits to them, so nothing you do would get a booking from them before they're guaranteed work. Some shops are just dicks and really push for a first hold from everyone in town like their hair's on fire. Then they never get back in touch with anyone if the job falls through or they go a different direction. Talked to producers about that from certain shops and they're like "yup. Sorry about that. They made me do it" Sometimes you're the backup, sometimes you're the primary target. You just never know. So my strategy is to not stress it too much and just give holds (if they insist I'll tell them where they are on the ladder, 1st, 2nd etc). The first person to put the money on the table wins. I'll call and offer challenges as a courtesy, but I never try to cherry pick jobs anymore. Too volatile. Pay me and I'm yours:) what a whore. But I'm usually on at least one hold, most of the time on two, occasionally on 3 or 4. That can get a bit hectic, but again I don't stress it too much. Most of the time one comes through and I give the courtesy of letting everyone else know. Communication with the producers and coordinators isn't a bad idea, they're the one's with the lists of names to call when a job comes up!
re: freelancing and improving your odds
The trick is to just work around wherever and whenever you can. I'm on a gig at XXXXX now (one of the shops I've been on hold with for about 50 times but was always booked elsewhere) and I know like 10 people there now from other random gigs or who just got off gigs with friends of mine, etc. So working breeds work. The folks I'm working with now will spread out and assuming I don't f&;^k up too bad, will remember me for a while and put my name in the hat wherever they move to. And I'll do the same. Before you know it, you'll know someone at just about every shop in town.
re: recruiters and reps
Recruiters are absolutely worthwhile. If only to get you INTO the places in the first place. At that point, it's the same as if you got the job yourself. Sometimes recruiters will get you mixed up with weird, painful little one off jobs, but even those pay the bills and you never know whether it'll be worth it or not in the long run, but money's money. It's a nice little backup, since you don't owe them anything while they try to drum up work. They also usually take their cut from the company or are fine pumping up your rate a bit to cover their fee if they can't. So you never really lose there.They can also help track down payments even if they didn't get you the gig (for some small percentage). I'd rather pay $150 or so to collect $5K and not have to be the heavy in some business relationship gone pear-shaped.
Probably also worth getting yourself an scorp or LLC for billing purposes. F^%k those EOR's. I literally just got an LLC (had billed through a rep of mine for years, but it became a tax problem for her) just for the job I'm on now. And it paid for itself in about 1 1/2 weeks of work. XXXX(EOR) wanted 20% out of the first $10K (and 10% thereafter)! 20%! For submitting an invoice and not much else. As I said, f&;*k them. LLC's are easy. Scorps are bit more of pain re: taxes and such, but I know plenty of people who have em. I had my accountant help me but have friends who have done it online also.
That help?
Send me your contact info and reel and I'll pass it on when I can (cuz that's how it works!).
"""
So there it is.
Some caveats: Obviously names of studios and stuff have been redacted. Always wanted to redact something. . .
I'd also bet that there are some gotchas re: the specific implications of LLC's/S-Corps etc. As I said, I had my accountant do it. Safer and easier and not much more expensive.
Bottom line re: holds, bookings, freelancing in general. . . If you're pretty good at what you do and (much) more importantly a pleasant person to be around, your dance card will fill up eventually. I've been in conversations with producers who will say things like "Nope. We can't hire her, she made some offensive statement around the EP. He hates her" or "Awww. So and so. He's such a good guy. Let's call him in" or "We had this one dude in and he looked like he was on crack. Not doing that again". Seriously. You will spend a LOT of time with the people you work with. Being a diligent worker and a nice person goes like 75% of the way to getting calls back and kickin ass at what you do doesn't hurt. If you are GREAT at what you do AND you're a good person to be around, you will work constantly, at least in any city that has a reasonable amount of work (I'm not making any assertions about my skills or how pleasant I am to be around:) But I can remember the name of every crazy talented, cool co-worker I've worked with over the years. It's not a big list, but I know that all of them work whenever and pretty much wherever they want (not to delve too deep into their inner wishes or anything . . .). I'd recommend (or hire) any of them in a heartbeat. Just saying. Work hard and be nice. It'll be like the shampoo commercial "she told her friend and she told her friend, and so on and so on. . . " Am I dating myself with that reference?
Be honest about what you can and can't do. Get help when you're in the weeds and be honest about how long things will take you. If you having a crappy experience, tough it out (unless it's crazy or abusive) and cross that name off your list of places you'll work in the future. It's really not that hard and if you like variety (and pressure) freelancing can be a fun lifestyle. Sometimes.
Happy hunting!
Friday, March 09, 2012
Using Bump and/or Normal Maps for Pose Space "Deformations"
That's a mouthful. Basically, this is a kind of addendum to the last post about animated textures. . . Similar, but different.
The idea is that you can add cool little details to your character (or whatever) using bump and/or normal maps. But you may not want these details all the time (think frown lines on a forehead, or muscle striations on a character when he flexes his muscles). So the trick is to hook the texture up like you would a pose space deformation, only being activated when you want it to be, in certain poses.
This is NOT so much about creating bump and normal maps, just about how you'd use them in this scenario.
Maya/Rigging: Using "Animated" Bump and Normal Maps from zeth willie on Vimeo.
Animating textures on your rig
Been asked a few times lately about using animated textures on a rig and how to control those textures. Like with most things in Maya there are a bunch of ways to do this . . . you could apply different textures to duplicates of geometry and literally swap geo for any given frame of texture you want, but that's a) a pain to set up and b) kinda like shooting a fly with bazooka. Heavier in your scene and more a pain to deal with. Instead, in this vid I'll go over a couple of different ways to use the ".frameExtension" of an image sequence to control what shows up as our texture. I also briefly discuss a more complicated way of doing the same thing using nuke and UV maps, which I covered in another tutorial.
BTW, I talk about using this on a face in the video, but you could obviously use this on any kind of shader connection for any part of an object. Faces are just the most obvious. . .
Maya/Rigging: Using Animated Textures from zeth willie on Vimeo.
BTW, I talk about using this on a face in the video, but you could obviously use this on any kind of shader connection for any part of an object. Faces are just the most obvious. . .
Maya/Rigging: Using Animated Textures from zeth willie on Vimeo.
Wednesday, February 29, 2012
Triple Switch!
That's gonna be the title for my new movie. . . Or the managerial move I make that loses my kid the little league championship game. . . Or a utility node in Maya.
The triple switch is such a weird node. . . Not sure I've ever seen anyone use it in production. But in certain circumstances it can be useful and on rare occasions can be very handy indeed.
Basically the idea of the node is that you can create a geometry-specific attribute of a single material. So, fer example, you could put one shader on 100 objects and have, say, the color be different for each object. Still using just one shader, mind you. . . the color is different for each object, but all the other attrs of the shaders behave as normal. Here's the vid about how that works.
Maya: Using the Triple Switch utility node from zeth willie on Vimeo.
It's kind of hard to imagine getting the most out of this node without some coding, since by definition the node becomes more useful the more stuff (and therefore connections) you have in your scene. . . Here's the code I used to set up the basic random color thingy from the video. To use it, hook the triple switch up to the material, apply the material shader to the objects. Select the TS, then the objects and run the code. Obviously, if you want different results (which you should, probably) then adjust whatever parameters and values you'd like:
EDIT: Here's the code I used to create the distance setup. Seems a bit wonky to do things this way, but it more or less works . . . The point here being that since you can use an attr to drive the triple switch, you can control that attr with any of the usual (or unusual means) you control attrs in Maya. For this one you'll need to create a ".tightenFalloff" attr on the measure object first. (BTW, you actually don't need to drive an attr with the distance numbers, you could just plug them into the triple switch directly, but that's a little mysterious for anyone who might use this. The point, again, was simply to illustrate that you don't need colors to drive the triple switch):
The triple switch is such a weird node. . . Not sure I've ever seen anyone use it in production. But in certain circumstances it can be useful and on rare occasions can be very handy indeed.
Basically the idea of the node is that you can create a geometry-specific attribute of a single material. So, fer example, you could put one shader on 100 objects and have, say, the color be different for each object. Still using just one shader, mind you. . . the color is different for each object, but all the other attrs of the shaders behave as normal. Here's the vid about how that works.
Maya: Using the Triple Switch utility node from zeth willie on Vimeo.
It's kind of hard to imagine getting the most out of this node without some coding, since by definition the node becomes more useful the more stuff (and therefore connections) you have in your scene. . . Here's the code I used to set up the basic random color thingy from the video. To use it, hook the triple switch up to the material, apply the material shader to the objects. Select the TS, then the objects and run the code. Obviously, if you want different results (which you should, probably) then adjust whatever parameters and values you'd like:
//triple switch should already be created and connected to shader

//select triple then objects

string $sel[] = `ls -sl`;

int $sizeObj = size($sel);

string $triple = $sel[0];


for ($i=1; $i<$sizeObj; $i++) {

    string $me = $sel[$i];

    select -r $me;


    //these are the per object attrs we're adding

    addAttr -at "float" -k 1 -ln "redMult";

    addAttr -at "float" -k 1 -ln "greenMult";

    addAttr -at "float" -k 1 -ln "blueMult";


    //these are the random values for those attrs

    float $rRand = `rand .75 1.25`;

    float $gRand = `rand .75 1.25`;

    float $bRand = `rand .75 1.25`;


    //assign the values to the attrs

    setAttr ($me + ".redMult") $rRand;

    setAttr ($me + ".greenMult") $gRand;

    setAttr ($me + ".blueMult") $bRand;


    //connect the objects to the TS

    string $child[] = `listRelatives -c $me`;

    string $shape = $child[0];

    string $meShape = ($shape + ".instObjGroups[0]");


    connectAttr ($meShape) ($triple+".input["+($i-1)+"].inShape");


    //connect the attrs to the TS at the same index the obj is connected

    connectAttr ($me + ".redMult") ($triple+".input["+($i-1)+"].inComp1");

    connectAttr ($me + ".greenMult") ($triple+".input["+($i-1)+"].inComp2");

    connectAttr ($me + ".blueMult") ($triple+".input["+($i-1)+"].inComp3");

    }


}
EDIT: Here's the code I used to create the distance setup. Seems a bit wonky to do things this way, but it more or less works . . . The point here being that since you can use an attr to drive the triple switch, you can control that attr with any of the usual (or unusual means) you control attrs in Maya. For this one you'll need to create a ".tightenFalloff" attr on the measure object first. (BTW, you actually don't need to drive an attr with the distance numbers, you could just plug them into the triple switch directly, but that's a little mysterious for anyone who might use this. The point, again, was simply to illustrate that you don't need colors to drive the triple switch):
///////////////////////

//color by distance

//////////////////////

{

//triple switch should already be created and connected to shader

//select triple then measure object, then textured objects

string $sel[] = `ls -sl`;

int $sizeObj = size($sel);

string $triple = $sel[0];

string $mObject = $sel[1];


for ($i=2; $i<$sizeObj; $i++) {

    string $me = $sel[$i];

    string $meDist = $me + "Distance";

    select -r $me;

    addAttr -at "float" -min 0 -max 1 -k 1 -ln "distance";


    //create distance node

    shadingNode -asUtility distanceBetween -n $meDist;

    connectAttr ($me + ".worldMatrix") ($meDist + ".inMatrix1");

    connectAttr ($mObject + ".worldMatrix") ($meDist + ".inMatrix2");

    connectAttr ($me + ".rotatePivotTranslate") ($meDist + ".point1");

    connectAttr ($mObject + ".rotatePivotTranslate") ($meDist + ".point2");


    //connect the distance to a mult node

    shadingNode -asUtility multiplyDivide -n ($me+"mult");

    connectAttr ($mObject+".tightenFalloff") (($me+"mult")+".input1X");

    connectAttr ($meDist+".distance") (($me+"mult")+".input2X");


    //connect the dist node to the attr on the object

    connectAttr (($me+"mult")+".outputX") ($me+".distance");


    string $child[] = `listRelatives -c $me`;

    string $shape = $child[0];

    string $meShape = ($shape + ".instObjGroups[0]");


    connectAttr ($meShape) ($triple+".input["+($i-2)+"].inShape");


    connectAttr ($me + ".distance") ($triple+".input["+($i-2)+"].inComp1");

    connectAttr ($me + ".distance") ($triple+".input["+($i-2)+"].inComp2");

    connectAttr ($me + ".distance") ($triple+".input["+($i-2)+"].inComp3");

    }


}
Tuesday, February 28, 2012
Geo caching for easier animation
Some students of mine were doing things that suggested geo-caching to me and I just used this on a job, so I was all like "wooohooo!". And then I made this video.
Basically talks about the general idea of geo-caching and then I show one example of what I used this on recently. General gist of it: Maya, Geometry, Cached.
Slightly less general gist: You'd use this to lighten some of the processing load in your scene, either by allowing you to eliminate heavy rigs or allowing you to use light version of your characters (i.e. just geo) for multiple instances of an animation. Basically baking animation into the geo itself for use later in various ways. So check it:
Edit/Addendum - Totally did not get back around to the bit about why the eyes and teeth didn't come along for the ride in the geo cache! Oops. That's Ok. The reading will do you good.
Here's the deal. . . geo won't get written to the cache (at least the default Maya cache) if it doesn't have something driving the shape node itself (like skinning or other deformers). Simply translating or rotating the geo won't cut it since that stuff operates on the transform node and leaves the shape node to rest a bit. Soooo. . . since I usually connect things like eyes and gums/teeth into the rig via some combo of parenting to groups and constraining those groups (it's easy, clean), when I try to include those in the cache, they sit completely still, unaffected by caching party going on around them. So the easiest way around that is to just bind them to a joint, either existing or created just for that purpose. If you do it carefully, you won't even have to weight them (bind them separately from the rest of the geo, just to one selected joint). But they'll then be included in the caching. The other option is to set up some kind of follicle system on your cache-catching rig, the simple one, whereby you'd use follicles or rivets to stick things like the eyes and teeth to the cache-animated geo. A bit wonkier, but whatever gets ya through the night, amiright?
Subscribe to:
Posts (Atom)