Good question! (Actually, a reader, BMDela, asked me this. . . so I'm only partially taking credit)
The question was posed thusly:
"""
So, I've been looking for an answer to this question everywhere, and can't seem to find it.
At what point do materials/shaders enter the equation?
Do you put the materials on the master character/props/set, then reference the shaded character into the animation scene?
What's a good workflow for implementing a shading network?
"""
The correct answer is . . . wait for it. . . "It depends!"
Lame, I know, but it's the truth. There are ways to do things that are more 'pipeline' correct and ways that are a bit more user friendly. Some projects work better one way, some the other. So let's look at the two basic ways of doing things. . .
1. Adding shaders to the master files (let's say to the master model files):
Doing this is basically putting your shaders (and their assignment to surfaces) at the front of the pipeline. That is to say, you make your models, uv and texture them completely, then pass them on to rigging, etc. This would seem to be the easiest way to do things and sometimes it is. What are the pros/cons?
PROS: the texture artist only has to apply the shaders once (in theory) no matter how big the show is. Let's say you have a show with 3 characters. The texture artist hits each one and then it doesn't matter whether there are 5 shots or 500, it's the same amount of work for those characters (unless there are changes, which may or may not be a pain in the butt).
CONS: There can definitely be issues with the fact that now all of your shaders are referenced (until you get to the very end of the pipeline). . . but the main problem here is that in heavier scenes you're always pushing around all the textures. When I was animating recently on Skylanders 2, some of the scenes took 3-4 minutes to load, mostly because of the massive amounts of texture files we had to pull over the network. Let's say, as an animation lead touching a lot of shots, I open 20 shots/day. If each shot takes 1 extra minute to load, that's 20 minutes/day. There are 10 leads opening that many shots, so that's 200 min/day to pull textures (that's not counting the 20 other animators who may open 5 shots/day). So over one month, just the animation leads spend ~4000 minutes (or 60+ hours) JUST TO OPEN SHOTS! That's a lot of time/money. And it's not a crazy scenario depending on the shots/network/etc. Might even be conservative . . .
2. The alternative is to push the texturing until closer to the end of the pipeline (after animation):
To be clear here, I'm not saying "don't create your textures until the end", I'm saying "don't assign your textures to the models until the end". So the texture artists would do the same thing as above, they'd just do it "offline" or in files that don't get pushed through rigging and animation. They would then export those textures into appropriate files that just have the textures in them. Then once things are animated, you can just import those textures and assign them to correct objects. Usually you'd want some textures in the master files, things like eyes and stuff that's involved with the rig, and maybe even apply basic color shaders so people can see what's up, but the heavy stuff stays out until after the animators are done.
PROS: Obviously the point here is that you don't have to push around hundred's of MB's of textures for each shot. Work can go much faster down the pipeline. You also avoid the annoying "doubling" of textures (if I reference 5 of the same plants, I end up with 5 copies of the same shader in my scene). You just import what's necessary. You're also doing the final assignments in context so you're making any fixes while you're actually in the scene.
CONS: Mainly that the work scales linearly. So more shots, more work. You can also get some surprises if you haven't seen the textures in action, and you'll see them with less time to fix them.
So the reality is that it depends . . . how heavy are your shots likely to be? How many of them are there? Are the textures integral to the animation or can the shots be animated without them? How rigorous is your pipeline? All theses questions will dictate which is the right way to go!
I've actually been pondering on scripting a system to keep track of what shader is applied to what mesh, etc so the texture artist could save out a file that would reapply the shaders later on down the pipeline automatically. Haven't gotten around to it yet. . . Does anything like this exist? (non-proprietary, obviously)
Anyways, hope that was helpful, let me know if there are any clever things I've missed!
Monday, October 01, 2012


Wednesday, August 15, 2012
Space Switching and Space Matching
I created a couple of new videos to talk about space switching and space matching. I think they're pretty self-explanatory, just going over the basics of what they are and some ways to set them up. Nothing too crazy, though the space matching one is a fair amount of python scripting (though again, nothing terribly hard if you're already using python).
But if you're into the more complicated bits, here are some links to info about them:
Charles Looker - http://charleslooker.wordpress.com/2012/02/25/multi-directional-constraints/
Hamish McKenzie - http://www.macaronikazoo.com/?page_id=413 (very illustrative, but be warned, some of his matrix math stuff used his own scripts to deal with the matrices, so it can be a bit confusing if you try to do it without installing his scripts first. But the principles are the same, I just use the API to do the matrix-y bits, which can be hella confusing in it's own right)
TD Matt - http://td-matt.blogspot.com/2010/12/broken-hierarchy-rig-and-space.html
Oh yeah, and the vids by Jeremy Ernst are here: https://vimeo.com/jernst. Good stuff!
And I'll say it just so you don't have to. . . My god am I long winded! Not sure how explaining space switching could possibly take that long. But what can you do? :)
Maya/Rigging: The basics of space switching from zeth willie on Vimeo.
Maya/Rigging: Space Matching from zeth willie on Vimeo.
But if you're into the more complicated bits, here are some links to info about them:
Charles Looker - http://charleslooker.wordpress.com/2012/02/25/multi-directional-constraints/
Hamish McKenzie - http://www.macaronikazoo.com/?page_id=413 (very illustrative, but be warned, some of his matrix math stuff used his own scripts to deal with the matrices, so it can be a bit confusing if you try to do it without installing his scripts first. But the principles are the same, I just use the API to do the matrix-y bits, which can be hella confusing in it's own right)
TD Matt - http://td-matt.blogspot.com/2010/12/broken-hierarchy-rig-and-space.html
Oh yeah, and the vids by Jeremy Ernst are here: https://vimeo.com/jernst. Good stuff!
And I'll say it just so you don't have to. . . My god am I long winded! Not sure how explaining space switching could possibly take that long. But what can you do? :)
Maya/Rigging: The basics of space switching from zeth willie on Vimeo.
Maya/Rigging: Space Matching from zeth willie on Vimeo.
Friday, July 13, 2012
Question about tranforms on a frozen object. . .
A fella named Jason emailed me at Vimeo with a question about the IK 2 FK snapping video I did (here):
"I'm a student over at rigging dojo and my mentor turned me towrds your ik fk snapping tool that you created. The script works great. But I would ask how do you handle ctrl curves when they have been say zeroed out at (5,5,5) but when I query there position i get back (0,0,0) and when i apply the proper cordinates to the ctrl curve it goes the right amount but because it was zeroed out it isn't right... Any help would be appreciated"
Thought it was a good question (as I would expect from Rigging Dojo!) and thought it was worth talking about for two reasons: 1) the problem/solution are kind of interesting (if you're into this kinda thing) and 2) it reinforces some stuff I've said in the past, which bears repeating. Namely, you're kinda doing it wrong.
{slight digression (would make it footnote if knew how). . . When I say "wrong" here I'm using the term loosely. That is, you may have valid reasons for doing whatever you're doing and in your case it may make sense, BUT in most ordinary circumstances, you're probably creating more trouble than you're saving. end of digression}
So second things first . . . What is "wrong" and why?:
It has to do with freezing your transforms. And THAT has to do with the Matrix ("whooa . . ."). Each object has a transformation matrix that basically keeps track of where the object is in space, how it's rotated, scaled, etc. I won't make a fool out of you and me by trying to explain it in detail (Hamish Mckenzie has some cool posts on his blog about it), cuz I don't know it that well. But what happens, more or less, when you freeze transforms is that you "reset" the objects matrix (or perhaps more accurately, offset the matrix) and tell it that where it is NOW is at 0, 0, 0. In the ordinary course of events, that may work, but when you come in with your cheeky little scripts and try to tell it to go somewhere specific, as you've discovered, there's a problem and Maya doesn't know what you mean (or again, to be more precise, Maya knows exactly what's going on, YOU don't know what you mean, or least I don't).
So that's what I mean when I say you're doing it wrong. Freezing transforms on controls is usually NOT the best way to zero them out. A much better way is to "group orient" them (some people call it "group freezing"). I even did a post and a video on the process. In short, you create your control at 0,0,0 and immediately group it. Then take the group and move THAT to the correct location + orientation, either with constraints that you then delete or better yet with "xform" and math and scripts and such. But you get two nice benefits: 1) the control stays at 0,0,0 because it's parented under the group that's doing all the moving and 2) because the control's matrix is then inheriting it's information from the group (which DOES have all the correct info with no offsets), both you and Maya are talking about the same world space, etc. and things like "xform" and "move" and stuff should work fine.
Sooooo. . . what if (as I imagine is the case) you've already done the freezing on your control and don't want to go back. Can you still use the IK2FK python code? The answer is "yes" (though I would recommend fixing the control using group orienting and being done with it. . .).
There are actually a few ways I would imagine. I read somewhere once that Maya stores the freeze transform offset matrix somewhere. I also bet that there's some way to get all smartypants and mathy and solve the problem by busting out some matrix voodoo. But since I can't do that (yet?), I can only offer a solution that will solve the translate problem the same way we did the rest of the script, with a lil elbow grease and vector math. It's not that hard:
Basically, the trick is to find the world space position of the IK control. If you just xform the transform node (the object), it obviously returns a weird value cuz the matrix has been offset. So instead, you need to do something like:
So all we're doing is figuring out the difference between the world space of the ik ctrl (trueIK) and the values the maya is giving us for the frozen transform (frozenIK) and applying that difference to the fk wrist position to get the final destination of the ik ctrl. This should also work when you HAVEN'T frozen the transforms (since the offset would then be 0).
Whew. Hope that makes sense ...
"I'm a student over at rigging dojo and my mentor turned me towrds your ik fk snapping tool that you created. The script works great. But I would ask how do you handle ctrl curves when they have been say zeroed out at (5,5,5) but when I query there position i get back (0,0,0) and when i apply the proper cordinates to the ctrl curve it goes the right amount but because it was zeroed out it isn't right... Any help would be appreciated"
Thought it was a good question (as I would expect from Rigging Dojo!) and thought it was worth talking about for two reasons: 1) the problem/solution are kind of interesting (if you're into this kinda thing) and 2) it reinforces some stuff I've said in the past, which bears repeating. Namely, you're kinda doing it wrong.
{slight digression (would make it footnote if knew how). . . When I say "wrong" here I'm using the term loosely. That is, you may have valid reasons for doing whatever you're doing and in your case it may make sense, BUT in most ordinary circumstances, you're probably creating more trouble than you're saving. end of digression}
So second things first . . . What is "wrong" and why?:
It has to do with freezing your transforms. And THAT has to do with the Matrix ("whooa . . ."). Each object has a transformation matrix that basically keeps track of where the object is in space, how it's rotated, scaled, etc. I won't make a fool out of you and me by trying to explain it in detail (Hamish Mckenzie has some cool posts on his blog about it), cuz I don't know it that well. But what happens, more or less, when you freeze transforms is that you "reset" the objects matrix (or perhaps more accurately, offset the matrix) and tell it that where it is NOW is at 0, 0, 0. In the ordinary course of events, that may work, but when you come in with your cheeky little scripts and try to tell it to go somewhere specific, as you've discovered, there's a problem and Maya doesn't know what you mean (or again, to be more precise, Maya knows exactly what's going on, YOU don't know what you mean, or least I don't).
So that's what I mean when I say you're doing it wrong. Freezing transforms on controls is usually NOT the best way to zero them out. A much better way is to "group orient" them (some people call it "group freezing"). I even did a post and a video on the process. In short, you create your control at 0,0,0 and immediately group it. Then take the group and move THAT to the correct location + orientation, either with constraints that you then delete or better yet with "xform" and math and scripts and such. But you get two nice benefits: 1) the control stays at 0,0,0 because it's parented under the group that's doing all the moving and 2) because the control's matrix is then inheriting it's information from the group (which DOES have all the correct info with no offsets), both you and Maya are talking about the same world space, etc. and things like "xform" and "move" and stuff should work fine.
Sooooo. . . what if (as I imagine is the case) you've already done the freezing on your control and don't want to go back. Can you still use the IK2FK python code? The answer is "yes" (though I would recommend fixing the control using group orienting and being done with it. . .).
There are actually a few ways I would imagine. I read somewhere once that Maya stores the freeze transform offset matrix somewhere. I also bet that there's some way to get all smartypants and mathy and solve the problem by busting out some matrix voodoo. But since I can't do that (yet?), I can only offer a solution that will solve the translate problem the same way we did the rest of the script, with a lil elbow grease and vector math. It's not that hard:
Basically, the trick is to find the world space position of the IK control. If you just xform the transform node (the object), it obviously returns a weird value cuz the matrix has been offset. So instead, you need to do something like:
cmds.xform(ctrlName, q=True, rp=True)
which will instead use something that's not part of the matrix business (rp is for the rotate pivot point). This will give you the world space of the object. When you compare THAT to the actual value you get from "xform" of the control, it gives you how far "off" you are from Maya's interpretation of the location. You now just need to know where to move it to, and since you've got the offset value, you just need to subtract THAT from the location of the FK ctrl to get the number you'd need to move the transform of the IK ctl. So putting those together and assuming everything else in the script is the same, the section where you move the IK wrist would look like this:#snap IK ctrl to wrist position
trueIKraw = cmds.xform(ikWrist, ws=True, q=True, rp=True) #get IK pos in true ws
trueIK = om.MVector(trueIKraw[0], trueIKraw[1],trueIKraw[2]) #make it a vector
frozenIKraw = cmds.xform(ikWrist, q=True, t=True) #get IK pos via matrix
frozenIK = om.MVector(frozenIKraw[0], frozenIKraw[1],frozenIKraw[2]) #make vector
offset = trueIK - frozenIK #get the offset value for the Ik ctrl
correctedFw = fw - offset #this modifies the fk pos to account for the offset
cmds.move(correctedFw.x, correctedFw.y, correctedFw.z, ikWrist, ws=True)
So all we're doing is figuring out the difference between the world space of the ik ctrl (trueIK) and the values the maya is giving us for the frozen transform (frozenIK) and applying that difference to the fk wrist position to get the final destination of the ik ctrl. This should also work when you HAVEN'T frozen the transforms (since the offset would then be 0).
Whew. Hope that makes sense ...
Thursday, July 12, 2012
Script for creating/editing message attrs . . .
I know I mentioned it in the 3rd part of the IK/FK snapping videos, so here it is for those of you who might be inclined to use it, the message mapping script . . .
If you're not sure what I'm talking about re: message attrs, watch this or look it up, sucka.
Here it is! zbw_messageMapper or go to the Downloads page above. . .
There are 2 tabs here:
 The first tab is for creating message attributes.
Select the object you want to add the message attrs to (the "base object") and click the "choose object" button to add it to the text field.
Click "add new attrs" to create a row that will allow you to type in the attr name and select the object the you want to send a message to that attr. You can do multiple attrs at a time, btw. If you want to delete the last row you created, click the red button (this just deletes the UI part, not any attrs). Once you've got what you need entered, then click the green button and the magic will happen. (it's really boring magic). A bit of text will pop up letting you know what you've got has been added and any problems or warnings should show up in your script editor. It will also run down what attr have been connected to what in the script editor.
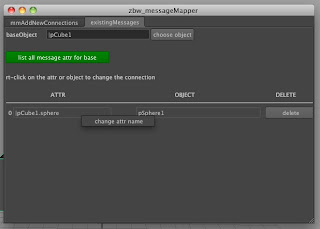 The second tab is reviewing what message attrs you have on your selected base obj.
Select your base the same way you did in the last tab and click "list all message attrs". Any attributes of type "message" (however they were created) will be listed below in columns, one for the attr, one for the connected obj, if any, and a delete button.
The delete button is obvious, I hope, but if you right click on either of the other two columns you'll get a little menu giving you the option to change the name of the attr or change the obj connected to that attr. Clicking on either will open up a little window that gives you opportunity to change the respective end of the connection (and obviously reconnect things when done).
That's about it. I taken care of most of the dummy checking here (i.e. what happens when there are no message attrs or when you leave a field empty, etc), but there may be some situation that spits out an error or something. Be aware that creation side will force connect things, so it will overwrite any attrs that have the same name. It will show this warning in the script editor (though it just does anyways. Ha!). It will also show a little text message in the main window once you've created the messages, which will disappear when you change base objs. I chose not to reset the fields back to empty in case you wanted to do multiple base obj with the same attrs.
Hope it's useful to someone. And let me know if there are any big problems. I may try to fix them, you never know.
To run it, put it into your python scripts folder (maya doesn't automatically read all scripts folders for python files) and type:
You can drag that code to your shelf and run it from a button there.
If you're not sure what I'm talking about re: message attrs, watch this or look it up, sucka.
Here it is! zbw_messageMapper or go to the Downloads page above. . .
There are 2 tabs here:

Select the object you want to add the message attrs to (the "base object") and click the "choose object" button to add it to the text field.
Click "add new attrs" to create a row that will allow you to type in the attr name and select the object the you want to send a message to that attr. You can do multiple attrs at a time, btw. If you want to delete the last row you created, click the red button (this just deletes the UI part, not any attrs). Once you've got what you need entered, then click the green button and the magic will happen. (it's really boring magic). A bit of text will pop up letting you know what you've got has been added and any problems or warnings should show up in your script editor. It will also run down what attr have been connected to what in the script editor.

Select your base the same way you did in the last tab and click "list all message attrs". Any attributes of type "message" (however they were created) will be listed below in columns, one for the attr, one for the connected obj, if any, and a delete button.
The delete button is obvious, I hope, but if you right click on either of the other two columns you'll get a little menu giving you the option to change the name of the attr or change the obj connected to that attr. Clicking on either will open up a little window that gives you opportunity to change the respective end of the connection (and obviously reconnect things when done).
That's about it. I taken care of most of the dummy checking here (i.e. what happens when there are no message attrs or when you leave a field empty, etc), but there may be some situation that spits out an error or something. Be aware that creation side will force connect things, so it will overwrite any attrs that have the same name. It will show this warning in the script editor (though it just does anyways. Ha!). It will also show a little text message in the main window once you've created the messages, which will disappear when you change base objs. I chose not to reset the fields back to empty in case you wanted to do multiple base obj with the same attrs.
Hope it's useful to someone. And let me know if there are any big problems. I may try to fix them, you never know.
To run it, put it into your python scripts folder (maya doesn't automatically read all scripts folders for python files) and type:
import zbw_messageMapper

zbw_messageMapper.messageMapper()
You can drag that code to your shelf and run it from a button there.
Tuesday, July 03, 2012
IK to FK snapping
These videos are about how you might approach and execute IK to FK snapping. (For those that don't know or use different terminology, that's where you run a script and it snaps your IK limb position to your FK limb position). It's something that I had always looked at as a bit of luxury, something to get to if there was time when building a rig (hint: there rarely was time). As I mention in the video, Michael Cawood pointed out to me that it is actually a time saver when you're doing a lot of quick blocking. If you pose your characters in IK mode in blocking, you have a lot less counter animation to do when you change the body rotations, for example. You can pose away in IK, then switch to FK when it comes time to animate (if you need to switch, that is). As I was one of the lead animators on that job with Michael, not a rigger (thank god, there were 50+ characters for that one), I didn't bother to offer up my services:) But I thought it would be a good topic for a video tute, so here it is. . .
There are 3 parts. 1) covers the basic idea and some rudimentary vector math 2) covers the python scipting of those concepts in Maya and 3) introduces "message attributes" which are nifty little attrs that can be really useful to bump up functionality of your rigs/scripts.
Maya/Rigging: IK to FK snapping, part 1 from zeth willie on Vimeo.
Maya/Rigging: IK to FK snapping, part 2 from zeth willie on Vimeo.
Maya/Rigging: IK to FK snapping, part 3 from zeth willie on Vimeo.
Oh, yeah. Here is the code for the basic version of the IK/FK script in python (the script using the message attrs will depend on your specific attr names):
Once I get the little things hammered out in the zbw_messageMapper script that I showed in the video, I'll post that up too. . .
EDIT: One more thing! Here's the link to Ryan Trowbridge's site. http://www.rtrowbridge.com/blog/ Not sure how to access individual posts, but the post from March 09 has the video of the MasterClass on Vector Math in Maya. Good stuff. Also just bought his book on Python for Games and Film. Can't wait to read it!
There are 3 parts. 1) covers the basic idea and some rudimentary vector math 2) covers the python scipting of those concepts in Maya and 3) introduces "message attributes" which are nifty little attrs that can be really useful to bump up functionality of your rigs/scripts.
Maya/Rigging: IK to FK snapping, part 1 from zeth willie on Vimeo.
Maya/Rigging: IK to FK snapping, part 2 from zeth willie on Vimeo.
Maya/Rigging: IK to FK snapping, part 3 from zeth willie on Vimeo.
Oh, yeah. Here is the code for the basic version of the IK/FK script in python (the script using the message attrs will depend on your specific attr names):
import maya.cmds as cmds
import maya.OpenMaya as om

#select the joints we need
sel = cmds.ls(sl=True)

#assign selection
fkWrist = sel[0]
fkShldr = sel[1]
fkElbow = sel[2]
ikWrist = sel[3]
ikPv = sel[4]

#get positions from fk
fkwRaw = cmds.xform(fkwrist, ws=True, q=True, t=True)
fkwPos = om.MVector(fkwRaw[0], fkwRaw[1], fkwRaw[2])

fkeRaw = cmds.xform(fkelbow, ws=True, q=True, t=True)
fkePos = om.MVector(fkeRaw[0], fkeRaw[1], fkeRaw[2])

fksRaw = cmds.xform(fkshldr, ws=True, q=True, t=True)
fksPos = om.MVector(fksRaw[0], fksRaw[1], fksRaw[2])

#set position of IK wrist ctrl
cmds.move(fkwPos.x, fkwPos.y, fkwPos.z, ikwrist)

#start figuring out pole vector pos

#find avg (midpoint) of shoulder and wrist
midpoint = (fkwPos + fksPos) / 2

#find pv direction
pvOrigin = fkePos - midpoint

#extend that length
pvRaw = pvOrigin * 2


#position pvRaw at midpoint
pvPos = pvRaw + midpoint

#stick pole vector at pvPos
cmds.move(pvPos.x, pvPos.y, pvPos.z, ikpv)
Once I get the little things hammered out in the zbw_messageMapper script that I showed in the video, I'll post that up too. . .
EDIT: One more thing! Here's the link to Ryan Trowbridge's site. http://www.rtrowbridge.com/blog/ Not sure how to access individual posts, but the post from March 09 has the video of the MasterClass on Vector Math in Maya. Good stuff. Also just bought his book on Python for Games and Film. Can't wait to read it!
Thursday, June 28, 2012
Follow up on getting work . . .
What this guys says:
http://effectscorner.blogspot.com/2012/06/getting-visual-effects-job.html#.T-zE3nAmZG-
How come he says it and it sounds smart and I say it and it comes out all curse words and aggressive?
. . .
F*&k him.
BTW, Scott Squires is seriously legit. Great blog too.
http://effectscorner.blogspot.com/2012/06/getting-visual-effects-job.html#.T-zE3nAmZG-
How come he says it and it sounds smart and I say it and it comes out all curse words and aggressive?
. . .
F*&k him.
BTW, Scott Squires is seriously legit. Great blog too.
Subscribe to:
Posts (Atom)