Good question! (Actually, a reader, BMDela, asked me this. . . so I'm only partially taking credit)
The question was posed thusly:
"""
So, I've been looking for an answer to this question everywhere, and can't seem to find it.
At what point do materials/shaders enter the equation?
Do you put the materials on the master character/props/set, then reference the shaded character into the animation scene?
What's a good workflow for implementing a shading network?
"""
The correct answer is . . . wait for it. . . "It depends!"
Lame, I know, but it's the truth. There are ways to do things that are more 'pipeline' correct and ways that are a bit more user friendly. Some projects work better one way, some the other. So let's look at the two basic ways of doing things. . .
1. Adding shaders to the master files (let's say to the master model files):
Doing this is basically putting your shaders (and their assignment to surfaces) at the front of the pipeline. That is to say, you make your models, uv and texture them completely, then pass them on to rigging, etc. This would seem to be the easiest way to do things and sometimes it is. What are the pros/cons?
PROS: the texture artist only has to apply the shaders once (in theory) no matter how big the show is. Let's say you have a show with 3 characters. The texture artist hits each one and then it doesn't matter whether there are 5 shots or 500, it's the same amount of work for those characters (unless there are changes, which may or may not be a pain in the butt).
CONS: There can definitely be issues with the fact that now all of your shaders are referenced (until you get to the very end of the pipeline). . . but the main problem here is that in heavier scenes you're always pushing around all the textures. When I was animating recently on Skylanders 2, some of the scenes took 3-4 minutes to load, mostly because of the massive amounts of texture files we had to pull over the network. Let's say, as an animation lead touching a lot of shots, I open 20 shots/day. If each shot takes 1 extra minute to load, that's 20 minutes/day. There are 10 leads opening that many shots, so that's 200 min/day to pull textures (that's not counting the 20 other animators who may open 5 shots/day). So over one month, just the animation leads spend ~4000 minutes (or 60+ hours) JUST TO OPEN SHOTS! That's a lot of time/money. And it's not a crazy scenario depending on the shots/network/etc. Might even be conservative . . .
2. The alternative is to push the texturing until closer to the end of the pipeline (after animation):
To be clear here, I'm not saying "don't create your textures until the end", I'm saying "don't assign your textures to the models until the end". So the texture artists would do the same thing as above, they'd just do it "offline" or in files that don't get pushed through rigging and animation. They would then export those textures into appropriate files that just have the textures in them. Then once things are animated, you can just import those textures and assign them to correct objects. Usually you'd want some textures in the master files, things like eyes and stuff that's involved with the rig, and maybe even apply basic color shaders so people can see what's up, but the heavy stuff stays out until after the animators are done.
PROS: Obviously the point here is that you don't have to push around hundred's of MB's of textures for each shot. Work can go much faster down the pipeline. You also avoid the annoying "doubling" of textures (if I reference 5 of the same plants, I end up with 5 copies of the same shader in my scene). You just import what's necessary. You're also doing the final assignments in context so you're making any fixes while you're actually in the scene.
CONS: Mainly that the work scales linearly. So more shots, more work. You can also get some surprises if you haven't seen the textures in action, and you'll see them with less time to fix them.
So the reality is that it depends . . . how heavy are your shots likely to be? How many of them are there? Are the textures integral to the animation or can the shots be animated without them? How rigorous is your pipeline? All theses questions will dictate which is the right way to go!
I've actually been pondering on scripting a system to keep track of what shader is applied to what mesh, etc so the texture artist could save out a file that would reapply the shaders later on down the pipeline automatically. Haven't gotten around to it yet. . . Does anything like this exist? (non-proprietary, obviously)
Anyways, hope that was helpful, let me know if there are any clever things I've missed!
Showing posts with label mental ray. Show all posts
Showing posts with label mental ray. Show all posts
Monday, October 01, 2012


Friday, March 09, 2012
Using Bump and/or Normal Maps for Pose Space "Deformations"
That's a mouthful. Basically, this is a kind of addendum to the last post about animated textures. . . Similar, but different.
The idea is that you can add cool little details to your character (or whatever) using bump and/or normal maps. But you may not want these details all the time (think frown lines on a forehead, or muscle striations on a character when he flexes his muscles). So the trick is to hook the texture up like you would a pose space deformation, only being activated when you want it to be, in certain poses.
This is NOT so much about creating bump and normal maps, just about how you'd use them in this scenario.
Maya/Rigging: Using "Animated" Bump and Normal Maps from zeth willie on Vimeo.
The idea is that you can add cool little details to your character (or whatever) using bump and/or normal maps. But you may not want these details all the time (think frown lines on a forehead, or muscle striations on a character when he flexes his muscles). So the trick is to hook the texture up like you would a pose space deformation, only being activated when you want it to be, in certain poses.
This is NOT so much about creating bump and normal maps, just about how you'd use them in this scenario.
Maya/Rigging: Using "Animated" Bump and Normal Maps from zeth willie on Vimeo.
Animating textures on your rig
Been asked a few times lately about using animated textures on a rig and how to control those textures. Like with most things in Maya there are a bunch of ways to do this . . . you could apply different textures to duplicates of geometry and literally swap geo for any given frame of texture you want, but that's a) a pain to set up and b) kinda like shooting a fly with bazooka. Heavier in your scene and more a pain to deal with. Instead, in this vid I'll go over a couple of different ways to use the ".frameExtension" of an image sequence to control what shows up as our texture. I also briefly discuss a more complicated way of doing the same thing using nuke and UV maps, which I covered in another tutorial.
BTW, I talk about using this on a face in the video, but you could obviously use this on any kind of shader connection for any part of an object. Faces are just the most obvious. . .
Maya/Rigging: Using Animated Textures from zeth willie on Vimeo.
BTW, I talk about using this on a face in the video, but you could obviously use this on any kind of shader connection for any part of an object. Faces are just the most obvious. . .
Maya/Rigging: Using Animated Textures from zeth willie on Vimeo.
Wednesday, February 29, 2012
Triple Switch!
That's gonna be the title for my new movie. . . Or the managerial move I make that loses my kid the little league championship game. . . Or a utility node in Maya.
The triple switch is such a weird node. . . Not sure I've ever seen anyone use it in production. But in certain circumstances it can be useful and on rare occasions can be very handy indeed.
Basically the idea of the node is that you can create a geometry-specific attribute of a single material. So, fer example, you could put one shader on 100 objects and have, say, the color be different for each object. Still using just one shader, mind you. . . the color is different for each object, but all the other attrs of the shaders behave as normal. Here's the vid about how that works.
Maya: Using the Triple Switch utility node from zeth willie on Vimeo.
It's kind of hard to imagine getting the most out of this node without some coding, since by definition the node becomes more useful the more stuff (and therefore connections) you have in your scene. . . Here's the code I used to set up the basic random color thingy from the video. To use it, hook the triple switch up to the material, apply the material shader to the objects. Select the TS, then the objects and run the code. Obviously, if you want different results (which you should, probably) then adjust whatever parameters and values you'd like:
EDIT: Here's the code I used to create the distance setup. Seems a bit wonky to do things this way, but it more or less works . . . The point here being that since you can use an attr to drive the triple switch, you can control that attr with any of the usual (or unusual means) you control attrs in Maya. For this one you'll need to create a ".tightenFalloff" attr on the measure object first. (BTW, you actually don't need to drive an attr with the distance numbers, you could just plug them into the triple switch directly, but that's a little mysterious for anyone who might use this. The point, again, was simply to illustrate that you don't need colors to drive the triple switch):
The triple switch is such a weird node. . . Not sure I've ever seen anyone use it in production. But in certain circumstances it can be useful and on rare occasions can be very handy indeed.
Basically the idea of the node is that you can create a geometry-specific attribute of a single material. So, fer example, you could put one shader on 100 objects and have, say, the color be different for each object. Still using just one shader, mind you. . . the color is different for each object, but all the other attrs of the shaders behave as normal. Here's the vid about how that works.
Maya: Using the Triple Switch utility node from zeth willie on Vimeo.
It's kind of hard to imagine getting the most out of this node without some coding, since by definition the node becomes more useful the more stuff (and therefore connections) you have in your scene. . . Here's the code I used to set up the basic random color thingy from the video. To use it, hook the triple switch up to the material, apply the material shader to the objects. Select the TS, then the objects and run the code. Obviously, if you want different results (which you should, probably) then adjust whatever parameters and values you'd like:
//triple switch should already be created and connected to shader

//select triple then objects

string $sel[] = `ls -sl`;

int $sizeObj = size($sel);

string $triple = $sel[0];


for ($i=1; $i<$sizeObj; $i++) {

    string $me = $sel[$i];

    select -r $me;


    //these are the per object attrs we're adding

    addAttr -at "float" -k 1 -ln "redMult";

    addAttr -at "float" -k 1 -ln "greenMult";

    addAttr -at "float" -k 1 -ln "blueMult";


    //these are the random values for those attrs

    float $rRand = `rand .75 1.25`;

    float $gRand = `rand .75 1.25`;

    float $bRand = `rand .75 1.25`;


    //assign the values to the attrs

    setAttr ($me + ".redMult") $rRand;

    setAttr ($me + ".greenMult") $gRand;

    setAttr ($me + ".blueMult") $bRand;


    //connect the objects to the TS

    string $child[] = `listRelatives -c $me`;

    string $shape = $child[0];

    string $meShape = ($shape + ".instObjGroups[0]");


    connectAttr ($meShape) ($triple+".input["+($i-1)+"].inShape");


    //connect the attrs to the TS at the same index the obj is connected

    connectAttr ($me + ".redMult") ($triple+".input["+($i-1)+"].inComp1");

    connectAttr ($me + ".greenMult") ($triple+".input["+($i-1)+"].inComp2");

    connectAttr ($me + ".blueMult") ($triple+".input["+($i-1)+"].inComp3");

    }


}
EDIT: Here's the code I used to create the distance setup. Seems a bit wonky to do things this way, but it more or less works . . . The point here being that since you can use an attr to drive the triple switch, you can control that attr with any of the usual (or unusual means) you control attrs in Maya. For this one you'll need to create a ".tightenFalloff" attr on the measure object first. (BTW, you actually don't need to drive an attr with the distance numbers, you could just plug them into the triple switch directly, but that's a little mysterious for anyone who might use this. The point, again, was simply to illustrate that you don't need colors to drive the triple switch):
///////////////////////

//color by distance

//////////////////////

{

//triple switch should already be created and connected to shader

//select triple then measure object, then textured objects

string $sel[] = `ls -sl`;

int $sizeObj = size($sel);

string $triple = $sel[0];

string $mObject = $sel[1];


for ($i=2; $i<$sizeObj; $i++) {

    string $me = $sel[$i];

    string $meDist = $me + "Distance";

    select -r $me;

    addAttr -at "float" -min 0 -max 1 -k 1 -ln "distance";


    //create distance node

    shadingNode -asUtility distanceBetween -n $meDist;

    connectAttr ($me + ".worldMatrix") ($meDist + ".inMatrix1");

    connectAttr ($mObject + ".worldMatrix") ($meDist + ".inMatrix2");

    connectAttr ($me + ".rotatePivotTranslate") ($meDist + ".point1");

    connectAttr ($mObject + ".rotatePivotTranslate") ($meDist + ".point2");


    //connect the distance to a mult node

    shadingNode -asUtility multiplyDivide -n ($me+"mult");

    connectAttr ($mObject+".tightenFalloff") (($me+"mult")+".input1X");

    connectAttr ($meDist+".distance") (($me+"mult")+".input2X");


    //connect the dist node to the attr on the object

    connectAttr (($me+"mult")+".outputX") ($me+".distance");


    string $child[] = `listRelatives -c $me`;

    string $shape = $child[0];

    string $meShape = ($shape + ".instObjGroups[0]");


    connectAttr ($meShape) ($triple+".input["+($i-2)+"].inShape");


    connectAttr ($me + ".distance") ($triple+".input["+($i-2)+"].inComp1");

    connectAttr ($me + ".distance") ($triple+".input["+($i-2)+"].inComp2");

    connectAttr ($me + ".distance") ($triple+".input["+($i-2)+"].inComp3");

    }


}
Thursday, August 11, 2011
Follow up some Linear Workflow stuff for Maya 2011 +
Been meaning to do this for a while, but never got around to it . . . And I got scooped a little bit! Derek Flood did a couple of short videos about this and lit a fire. Thanks Derek!
Anyways a quick overview (as quick as I can do it, everyone else seems to have a better grasp of the brevity thing than I do) of how linear stuff embedded in Maya 2011/2 relates to what you may have been doing before . . . not expansive, just pointing a few things out.
*EDIT* Derek was kind enough to point out some of the specific bugs/weirdnesses he's found in the comments. Check it out if you're interested!
Maya/Mental Ray: Linear Workflow in Maya 2011 from zeth willie on Vimeo.
HERE'S (rt click, save as) the updated zbw_gamma script that works by shader selection and sticks gammas into the color channels. You can also adjust any/all gamma nodes in the scene or delete them globally.
Anyways a quick overview (as quick as I can do it, everyone else seems to have a better grasp of the brevity thing than I do) of how linear stuff embedded in Maya 2011/2 relates to what you may have been doing before . . . not expansive, just pointing a few things out.
*EDIT* Derek was kind enough to point out some of the specific bugs/weirdnesses he's found in the comments. Check it out if you're interested!
Maya/Mental Ray: Linear Workflow in Maya 2011 from zeth willie on Vimeo.
HERE'S (rt click, save as) the updated zbw_gamma script that works by shader selection and sticks gammas into the color channels. You can also adjust any/all gamma nodes in the scene or delete them globally.
Wednesday, August 10, 2011
Creating a reflection "sheen" pass for your scene
Every semester I end up explaining this in a really rushed and half-hearted way to a bunch of poor students who are in my animation class. Rather than do that again, I finally wised-up and made a video about it. . .
Somehow my videos seem to get longer and longer, so I split this up after the fact and made two videos (it's like my inner self is telling me to do less videos and more text-y type tutorials).
The first video is the basic stuff for setting up a render pass that will give a nice shiny reflection pass for your scene (stuff like a cell phone or tv in a commercial) and the second chunk of it gives a few ways to customize this concept and make it a more reusable using things like RGB passes for various different reflections, etc.
This is something that is really useful to know how to do in production, especially for stuff like commercials, so hopefully I haven't made it tooooo loooong and boring . . .
Maya/Mental Ray: Rendering a reflection "sheen" pass - part 1 from zeth willie on Vimeo.
Maya/Mental Ray: Rendering a reflection "sheen" pass - part 2 from zeth willie on Vimeo.
BTW, HERE'S the script that I use at the end for pulling stuff out to a render layer with custom color overrides . . . (rt click, save as)
Somehow my videos seem to get longer and longer, so I split this up after the fact and made two videos (it's like my inner self is telling me to do less videos and more text-y type tutorials).
The first video is the basic stuff for setting up a render pass that will give a nice shiny reflection pass for your scene (stuff like a cell phone or tv in a commercial) and the second chunk of it gives a few ways to customize this concept and make it a more reusable using things like RGB passes for various different reflections, etc.
This is something that is really useful to know how to do in production, especially for stuff like commercials, so hopefully I haven't made it tooooo loooong and boring . . .
Maya/Mental Ray: Rendering a reflection "sheen" pass - part 1 from zeth willie on Vimeo.
Maya/Mental Ray: Rendering a reflection "sheen" pass - part 2 from zeth willie on Vimeo.
BTW, HERE'S the script that I use at the end for pulling stuff out to a render layer with custom color overrides . . . (rt click, save as)
Sunday, March 27, 2011
Creating custom UV pass in MR and using it in Nuke
That's a mouthful.
On a job recently I got some secondhand Nuke goodness when a lighting TD showed me how they were using UV passes from Maya to "auto-track" some footage into their shots (I wasn't on that job). The basic issue was that a lot of footage had to go onto screens in the spot and some of that footage wasn't ready or the client was changing their mind about what the footage should be. So, in short, any manual trick to the get the footage locked onto the CG screens required redoing some additional work in post, in terms of tracking, etc. Additionally, sometimes late notes were coming in about animation changes to the screens themselves, which meant that there was no option to render "in-camera" in Maya, it had be done in post.
So the simple solution was to render the screens with properly adjusted UV's as UV passes. This automatically locked the footage in place and wasn't dependent on any additional work once the comp was built, even if the footage had to be completely replaced or the animation of the screen itself changed. Pretty sweet. While I'm sure some people think this is obvious, I didn't (and neither did a lot of the other people I was working with. So I'm not the only ignorant one.)
In any event, I also realized that I never really followed up on any render pass stuff in Maya 2010/11, so the first vid below is basically what we're trying to do and how to get custom color passes out of Mental Ray (as opposed to the "regular" passes that are pre-set, like reflection, diffuse, etc). I use this method to get out RGB matte passes and a UV pass in EXR format.
The second video is how to actually use the UV pass in Nuke to get the basic effect we're looking for. Nothing crazy, just basic use of the UV pass.
Maya/Mental Ray: Custom Color Passes (2010) Part 1 - UV Pass from zeth willie on Vimeo.
Maya/Mental Ray: Custom Color Passes (2010) Part 2 - UV Pass from zeth willie on Vimeo.
On a job recently I got some secondhand Nuke goodness when a lighting TD showed me how they were using UV passes from Maya to "auto-track" some footage into their shots (I wasn't on that job). The basic issue was that a lot of footage had to go onto screens in the spot and some of that footage wasn't ready or the client was changing their mind about what the footage should be. So, in short, any manual trick to the get the footage locked onto the CG screens required redoing some additional work in post, in terms of tracking, etc. Additionally, sometimes late notes were coming in about animation changes to the screens themselves, which meant that there was no option to render "in-camera" in Maya, it had be done in post.
So the simple solution was to render the screens with properly adjusted UV's as UV passes. This automatically locked the footage in place and wasn't dependent on any additional work once the comp was built, even if the footage had to be completely replaced or the animation of the screen itself changed. Pretty sweet. While I'm sure some people think this is obvious, I didn't (and neither did a lot of the other people I was working with. So I'm not the only ignorant one.)
In any event, I also realized that I never really followed up on any render pass stuff in Maya 2010/11, so the first vid below is basically what we're trying to do and how to get custom color passes out of Mental Ray (as opposed to the "regular" passes that are pre-set, like reflection, diffuse, etc). I use this method to get out RGB matte passes and a UV pass in EXR format.
The second video is how to actually use the UV pass in Nuke to get the basic effect we're looking for. Nothing crazy, just basic use of the UV pass.
Maya/Mental Ray: Custom Color Passes (2010) Part 1 - UV Pass from zeth willie on Vimeo.
Maya/Mental Ray: Custom Color Passes (2010) Part 2 - UV Pass from zeth willie on Vimeo.
Thursday, March 24, 2011
A quick little Gamma script
I said I would post some stuff and 10 minutes later, here I am (pats self on back) . . .
Working on a job recently, we were using linear workflow, which is sweeeeet, but not so shocking since this was a pretty big studio that does mostly photo-real work. But they actually didn't have any automated way to deal with the gamma correct nodes in the scene (that I or anyone I talked to knew about). I got to one scene that I was animating and went to do a rough mock up of the texturing and lighting and realized with all of the objects and references and such that there were 40 or 50 shaders that needed a gamma correct node. So I decided to just write a quick script to do it. I know there are versions of this kind of stuff out there already, but if it's something manageable, I prefer to do it myself. I feel like I learn more that way.
Turns out, it's actually kind of hard to do scripting for this stuff. Basically, I just wanted 3 basic things. Add a gamma correct node right before the color slot of any shader I select (or all shaders), be able to adjust those nodes (turn the gamma from .455 to 1 and visa versa) and be able to remove all the gamma nodes if I want to. What turns out to be really tricky is navigating upstream/downstream from the selected materials. If I wanted to put a gamma correct node somewhere upstream from the selected shaders I would have to traverse back up through connections recursively and run the risk of encountering loops and such. Basically, navigating through shader trees is trickier than objects, because without the DAG hierarchy (parent/child) there's not such a clear and definitive relationship between nodes. I'm sure it's doable, but started getting deeper than I was interested in going, so I simplified things.
I wrote a script that will look at the "color" channel of a shader (I did blinn, phong, anisotropic, lambert, surface shader, mia, mia_x, mia_x_passes, testing for their respective color channels) and look for a gamma correct node connected there. If there's not one, it will add it with the values you input. You can choose materials to apply this to, or do it to all of them. If there's nothing going into the color channel, no gamma is created. You can then adjust or delete the gammas (again only the gammas connected to the color channels) from the other tabs in the UI.
Basically, as long as your only worried about color information connected to the material and you're not adding any gamma correct nodes elsewhere in the tree, this script should cover you. Just run the scripts (zbw_gamma) select the materials you need gammas for (i.e. blinn, mia_material_x_passes, etc) and use the buttons/tabs to add, adjust or remove them.
As usual, I make no guarantees about how it will work for you, so don't plan on funding your retirement by suing me. (Like I've mentioned before, part of my reasoning for posting these scripts is just so that I have access to them if the studio I'm at has locked USB ports or something. Easier than emailing them to myself every job :)
Oh, BTW, I know there is some pretty useful gamma stuff in 2011 now. I've only been at 1 (!) studio that uses 2011 in production. And that was pretty hairy. I'm sure more than that do, but 2010 is still the most common release for use in production in NYC as far as I can tell. Any studio that has any significant pipeline tools, render farms, etc, would have to change/update all the code to incorporate 2011 into the pipeline and I'm not sure it's worth it at this point (actually, it's obviously not worth it yet, the proof is in the pudding, as they say)
Anyways, happy gamma-ing!
You can download the script HERE.


Working on a job recently, we were using linear workflow, which is sweeeeet, but not so shocking since this was a pretty big studio that does mostly photo-real work. But they actually didn't have any automated way to deal with the gamma correct nodes in the scene (that I or anyone I talked to knew about). I got to one scene that I was animating and went to do a rough mock up of the texturing and lighting and realized with all of the objects and references and such that there were 40 or 50 shaders that needed a gamma correct node. So I decided to just write a quick script to do it. I know there are versions of this kind of stuff out there already, but if it's something manageable, I prefer to do it myself. I feel like I learn more that way.
Turns out, it's actually kind of hard to do scripting for this stuff. Basically, I just wanted 3 basic things. Add a gamma correct node right before the color slot of any shader I select (or all shaders), be able to adjust those nodes (turn the gamma from .455 to 1 and visa versa) and be able to remove all the gamma nodes if I want to. What turns out to be really tricky is navigating upstream/downstream from the selected materials. If I wanted to put a gamma correct node somewhere upstream from the selected shaders I would have to traverse back up through connections recursively and run the risk of encountering loops and such. Basically, navigating through shader trees is trickier than objects, because without the DAG hierarchy (parent/child) there's not such a clear and definitive relationship between nodes. I'm sure it's doable, but started getting deeper than I was interested in going, so I simplified things.
I wrote a script that will look at the "color" channel of a shader (I did blinn, phong, anisotropic, lambert, surface shader, mia, mia_x, mia_x_passes, testing for their respective color channels) and look for a gamma correct node connected there. If there's not one, it will add it with the values you input. You can choose materials to apply this to, or do it to all of them. If there's nothing going into the color channel, no gamma is created. You can then adjust or delete the gammas (again only the gammas connected to the color channels) from the other tabs in the UI.
Basically, as long as your only worried about color information connected to the material and you're not adding any gamma correct nodes elsewhere in the tree, this script should cover you. Just run the scripts (zbw_gamma) select the materials you need gammas for (i.e. blinn, mia_material_x_passes, etc) and use the buttons/tabs to add, adjust or remove them.
As usual, I make no guarantees about how it will work for you, so don't plan on funding your retirement by suing me. (Like I've mentioned before, part of my reasoning for posting these scripts is just so that I have access to them if the studio I'm at has locked USB ports or something. Easier than emailing them to myself every job :)
Oh, BTW, I know there is some pretty useful gamma stuff in 2011 now. I've only been at 1 (!) studio that uses 2011 in production. And that was pretty hairy. I'm sure more than that do, but 2010 is still the most common release for use in production in NYC as far as I can tell. Any studio that has any significant pipeline tools, render farms, etc, would have to change/update all the code to incorporate 2011 into the pipeline and I'm not sure it's worth it at this point (actually, it's obviously not worth it yet, the proof is in the pudding, as they say)
Anyways, happy gamma-ing!
You can download the script HERE.


Friday, March 05, 2010
Creating custom render passes in Maya & Mental Ray
Been studying up on how to create some render passes in Maya/Mental Ray. I'm using 2008 (so sue me), but this should mostly be applicable to 2009/10, as well, because there are some issues with the render passes coming out of both of those versions (mostly much longer renders, as Sagroth talks about HERE).
Basically the idea is to use the mia_x shader in particular to get a full spectrum of render passes basically at no cost (or little cost) to the render time of the images. This can be HUGE when you're rendering a longer animation or a series of animations.
Problem is that it's REALLY complicated, so I do it in three parts here. Part 1 talks about why you'd want to do this, Part 2 talks about the basic setup in Maya using the SimplePasses shader (which you can download HERE) and Part 3 talks about adding multiple shaders to your passes (both multiple mia_x and other custom passes) and some things to look out for re: render layers.
BTW, the script I'm using in the vids is here, though I make no promises about it. I fixed a couple things and can't replicate the weirdness from the 3rd vid, so I think . . . think . . . it should work OK for most things. To use it, source it, then type "zbw_renderPasses". If you open it in a text editor, there are some basic instructions in the header . . .
So anyways, here are the vids :)
Maya/Mental Ray: Custom Render Passes (Maya 2008) Part 1 from zeth willie on Vimeo.
Maya/Mental Ray: Custom Render Passes (Maya 2008) Part 2 from zeth willie on Vimeo.
Maya/Mental Ray: Custom Render Passes (Maya 2008) Part 3 from zeth willie on Vimeo.
Basically the idea is to use the mia_x shader in particular to get a full spectrum of render passes basically at no cost (or little cost) to the render time of the images. This can be HUGE when you're rendering a longer animation or a series of animations.
Problem is that it's REALLY complicated, so I do it in three parts here. Part 1 talks about why you'd want to do this, Part 2 talks about the basic setup in Maya using the SimplePasses shader (which you can download HERE) and Part 3 talks about adding multiple shaders to your passes (both multiple mia_x and other custom passes) and some things to look out for re: render layers.
BTW, the script I'm using in the vids is here, though I make no promises about it. I fixed a couple things and can't replicate the weirdness from the 3rd vid, so I think . . . think . . . it should work OK for most things. To use it, source it, then type "zbw_renderPasses". If you open it in a text editor, there are some basic instructions in the header . . .
So anyways, here are the vids :)
Maya/Mental Ray: Custom Render Passes (Maya 2008) Part 1 from zeth willie on Vimeo.
Maya/Mental Ray: Custom Render Passes (Maya 2008) Part 2 from zeth willie on Vimeo.
Maya/Mental Ray: Custom Render Passes (Maya 2008) Part 3 from zeth willie on Vimeo.
Monday, December 28, 2009
Maya/Mental Ray: Portal Light
Was looking around at some lighting/rendering sites and noticed how often some people use the portal light/sky light in mental ray. Not much stuff about that, though, regarding Maya. So I thought I'd throw up a vid about what it is and how one might use it. It's a pretty cool shader/light that solves a couple of specific problems and can actually be used in bunches of other circumstances. Some more info can definitely be found at Zap's site and Andrew's site.
Maya/Mental Ray: Portal Lights
Maya/Mental Ray: Portal Lights
Thursday, December 17, 2009
Maya Mental Ray - the basics of linear workflow
Finally had a bit of time, between all of the stuff (work, teaching, life), to create a few videos tutorials!
I love it when people take the time to create detailed tutorials and I've watched more than my share, so I thought it would be fun to make a few myself. Since I'm teaching animation right now, I'm always talking about that and I'll eventually throw some stuff up about animation things related to my class, but for now, I'm mostly doing stuff that I think is more interesting to me lately and maybe a bit more esoteric. Definitely not super advanced stuff for the most part (unless you're a total beginner, which is cool too), but just sort of picking and choosing what I feel like exploring. Some of it is might be a bit complicated and specific, like some rigging stuff, but others are about stuff I'm just learning the finer details of myself, like the mental ray joint that follows.
BTW, I know that I can be a bit over-explainy and pedantic sometimes. So sue me. Too much classroom time (I was a HS teacher in NYC before I started digital stuff). But I hate it when people assume I always know what they're talking about when I don't. Just went to my finacial advisor and WHOOSH. Right over my head. Didn't understand a word. Sometimes the simple stuff is interesting to me too, dude. I went a bit crazy with the first one, so it's in four parts. I also get a bit fast and loose with the specific lingo sometimes (gamma correction, gamma encoding, float, HDR, etc). Feel free to correct anything that's wrong or bugging you in the vids, or let me know and I'll do it.
Anyways, I'll throw a bunch of posts up as I see fit with the rest of these mama-jammas . . .
part1=gamma, part2=basic workflow, part3=real workflow, part4=basic post stuff
Maya/Mental Ray: Linear Workflow Part 1
Maya/Mental Ray: Linear Workflow Part 2
Maya/Mental Ray: Linear Workflow Part 3
Maya/Mental Ray: Linear Workflow Part 4
Here are some of the links I mentioned in the video:
1. The man, the myth, the legend . . . Master Zap
2. djx talks about linear and gamma
3. Andrew at 3dLight talks about linear for Maya/MentalRay
4. floze does a tute about linear rendering in a series of interiors
5. A long CGTalk thread about the topic
6. A much more detailed Mental Images thread
7. A detailed article by Yves Poissant on Tone Correction
Good lord. Here's a couple more for post-production stuff:
1. A bit of AE stuff
2. S'more AE, a bit more complicated this time
3. A good generally useful pdf
Sunday, December 21, 2008
RGB light passes
Just a little thing about lighting/rendering/comping, based on what Josh Harvey and Eric Concepcion were doing for the Fusion Fall cinematic in the last post. This may be familiar to some people, but I hadn't seen it before in production, so I thought I'd give a little example. Josh was cool enough to explain it a few times to those of us who were interested and I think it's pretty cool.
The basic idea:
This is a really cool way to extend your flexibility in post-production. The concept is that rather than render RGB passes for the scene (or each light or whatever), you actually assign each light to a color channel and render each lighting pass with three individual light passes included. In essence, each light pass (render) will include one light in the red channel, one in the blue and one in the green. These are then used to reveal an ambient color pass of the scene based on each light channel. Let me show you with a simple example.
Example of RGB Light Passes (a simple version for clarity):
 Let's say this is my scene. I'll do a simple 3 point light setup with a key light (directional), a fill (spot) and a rim (spot). I've added a bit of simple color to the character to make things more clear. Normally, I'd set up the lights, adjust their color and render a beauty pass (diffuse +/- spec, etc). maybe I'd add a shadow pass, amb occlusion, other passes, etc. But the idea would be that certainly the beauty pass would include all the lights. If I wanted to break out the lights for more control I would render a seperate RGBA pass for each light.
The idea here is a bit different. I'm leaving any light color info until post, so all I need to do is render the luminance (or diffuse/spec MINUS color) for each light. So I can use only one channel per light. It's a pretty easy setup actually. Only two passes (+ an amb occl pass, for fun)
First I'll take care of my color info. To do this I'll hide my three real lights and create an ambient light. You can do this from within the textures, by turning up the ambience, but I think it's much easier to turn off the ambience in the textures (you probly never had it on) and just make an ambient light. The only catch here is that the ambient light defaults to having an "ambient shade" value of 0.5, which sort of defeats the purpose. So turn that to 0.0 and make sure you've got no other lights on and render.
You'll get a pure color pass. Doesn't say much for my textures, but this is what I wanted.
 This becomes the "base" for the lighting setup.
Now I'll take each light in turn and assign it's color to R, G, or B. My key light becomes pure red, fill pure green and rim pure blue.

Once each light is given a color, the render looks something like this. It seems very colorful, but really that's only because we've got a "false color" thing going on. The keylight isn't really pure red, it's just in the red channel to get it to post. Same with the other lights. (BTW, if you have more lights, you'd just do another pass with other lights in the RGB channels. You'd just do this whole process twice or more). Here's what the individual channels look like:

Now once we take it to post we can see why this method is actually pretty powerful.
Here I'm using Shake, just cause it's easier to see stuff and a bit less work/layers for comping. Could easily be done in After Effects or whatever. These are the only two layers I'm bringing for now (I'll bring in an AO pass later).
The trick is to seperate out the channels for each light and use THAT to matte out the color pass. So the light (from each channel) actually reveals the pure color, or doesn't. Basically making our own diffuse color pass. In Shake that's done with a "reorder", in After Effect it'd be a "shift channel", I think. (BTW, I'm sure there are few other ways to do this . . .)

You can see I created three reorders and pump the light pass into each one. Each channel gets shifted to red for the key, green for the fill, etc. Each one of those goes into a copy of the color pass as a mask (so it has the correct colors to reveal). So I end up with this node tree. (note: below the color passes are some "switch matte" nodes just to put the correct alpha channel back. I also added the Ambient Occlusion pass at the bottom of the tree)

To clarify each color pass looks like this when matted with the correct light channel.
Since we're just adding "light" to the scene, you can then just "add" each of these passes to each other to get the final fully lit image. (In After Effects or Photoshop, I'll just use transfer mode "add" to lay one on top of the other.) As I noted, I multiplied an occlusion pass at the end, also.
Finally, we can get to what's cool ab0ut this . . . Here's the image as it stands:
The power comes from my ability to now start adjusting each light/color pass. In Shake I just stick some nodes under each pass (in this case I just used a mult node to color each pass and fade node for the transparency of each pass):
 By changing the transparency of each pass and the color of each pass you can end up with a huge array of options.
More theatrical?

More alien?

 I changed all of that instantly, without any rerendering of anything. Notice that I've actually changed not only the color, but the intensity of each individual light on the fly. I could also change the gamma, etc for each light as I see fit, any color correction really.
This image is a bit dark and lo-res, etc, so it might not be the best example, but it shows the basic principles. There are lots of variations. You could do groups of lights per pass in a more complex scene, or render a FG pass, then add some subtle lighting effects to that with this method, etc. It's a great idea to render shadow passes this way by making the shadows from each light R, G, or B and seperating them in post. I wouldn't do this for everything, but for things where there's a more stylized look, I think the flexibility is invaluable. As I said, Josh and Eric rendered all of Fusion Fall this way.
Another bonus is the disc space it saves if you want this much control. Instead of an RGBA pass for each light you get three passes in one. I love the idea a reusing the channels for other things besides color. I'll do something later about RGB combo passes and ID mattes, etc. But that's enough tech stuff for now.
The basic idea:
This is a really cool way to extend your flexibility in post-production. The concept is that rather than render RGB passes for the scene (or each light or whatever), you actually assign each light to a color channel and render each lighting pass with three individual light passes included. In essence, each light pass (render) will include one light in the red channel, one in the blue and one in the green. These are then used to reveal an ambient color pass of the scene based on each light channel. Let me show you with a simple example.
Example of RGB Light Passes (a simple version for clarity):
 Let's say this is my scene. I'll do a simple 3 point light setup with a key light (directional), a fill (spot) and a rim (spot). I've added a bit of simple color to the character to make things more clear. Normally, I'd set up the lights, adjust their color and render a beauty pass (diffuse +/- spec, etc). maybe I'd add a shadow pass, amb occlusion, other passes, etc. But the idea would be that certainly the beauty pass would include all the lights. If I wanted to break out the lights for more control I would render a seperate RGBA pass for each light.
The idea here is a bit different. I'm leaving any light color info until post, so all I need to do is render the luminance (or diffuse/spec MINUS color) for each light. So I can use only one channel per light. It's a pretty easy setup actually. Only two passes (+ an amb occl pass, for fun)
First I'll take care of my color info. To do this I'll hide my three real lights and create an ambient light. You can do this from within the textures, by turning up the ambience, but I think it's much easier to turn off the ambience in the textures (you probly never had it on) and just make an ambient light. The only catch here is that the ambient light defaults to having an "ambient shade" value of 0.5, which sort of defeats the purpose.
 So turn that to 0.0 and make sure you've got no other lights on and render.
You'll get a pure color pass. Doesn't say much for my textures, but this is what I wanted.
 This becomes the "base" for the lighting setup.
Now I'll take each light in turn and assign it's color to R, G, or B. My key light becomes pure red, fill pure green and rim pure blue.

Once each light is given a color, the render looks something like this.
 It seems very colorful, but really that's only because we've got a "false color" thing going on. The keylight isn't really pure red, it's just in the red channel to get it to post. Same with the other lights. (BTW, if you have more lights, you'd just do another pass with other lights in the RGB channels. You'd just do this whole process twice or more). Here's what the individual channels look like:

Now once we take it to post we can see why this method is actually pretty powerful.
Here I'm using Shake, just cause it's easier to see stuff and a bit less work/layers for comping. Could easily be done in After Effects or whatever.
 These are the only two layers I'm bringing for now (I'll bring in an AO pass later).
The trick is to seperate out the channels for each light and use THAT to matte out the color pass. So the light (from each channel) actually reveals the pure color, or doesn't. Basically making our own diffuse color pass. In Shake that's done with a "reorder", in After Effect it'd be a "shift channel", I think. (BTW, I'm sure there are few other ways to do this . . .)


You can see I created three reorders and pump the light pass into each one. Each channel gets shifted to red for the key, green for the fill, etc. Each one of those goes into a copy of the color pass as a mask (so it has the correct colors to reveal). So I end up with this node tree. (note: below the color passes are some "switch matte" nodes just to put the correct alpha channel back. I also added the Ambient Occlusion pass at the bottom of the tree)

To clarify each color pass looks like this when matted with the correct light channel.

Since we're just adding "light" to the scene, you can then just "add" each of these passes to each other to get the final fully lit image. (In After Effects or Photoshop, I'll just use transfer mode "add" to lay one on top of the other.) As I noted, I multiplied an occlusion pass at the end, also.
Finally, we can get to what's cool ab0ut this . . . Here's the image as it stands:

The power comes from my ability to now start adjusting each light/color pass. In Shake I just stick some nodes under each pass (in this case I just used a mult node to color each pass and fade node for the transparency of each pass):
 By changing the transparency of each pass and the color of each pass you can end up with a huge array of options.
More theatrical?

More alien?

 I changed all of that instantly, without any rerendering of anything. Notice that I've actually changed not only the color, but the intensity of each individual light on the fly. I could also change the gamma, etc for each light as I see fit, any color correction really.
This image is a bit dark and lo-res, etc, so it might not be the best example, but it shows the basic principles. There are lots of variations. You could do groups of lights per pass in a more complex scene, or render a FG pass, then add some subtle lighting effects to that with this method, etc. It's a great idea to render shadow passes this way by making the shadows from each light R, G, or B and seperating them in post. I wouldn't do this for everything, but for things where there's a more stylized look, I think the flexibility is invaluable. As I said, Josh and Eric rendered all of Fusion Fall this way.
Another bonus is the disc space it saves if you want this much control. Instead of an RGBA pass for each light you get three passes in one. I love the idea a reusing the channels for other things besides color. I'll do something later about RGB combo passes and ID mattes, etc. But that's enough tech stuff for now.
Tuesday, September 16, 2008
Technical - Figuring out Linear Workflow in Maya
Another techy thing. Just learning about this stuff and wanted to throw some stuff up about it. This is specifically Maya related (more specifically Mental Ray).
This is called Linear Workflow . . . I'll give you the most simple version (and hope that I don't get that too wrong).
Basically, the gist is this. When you're working in Maya (or most other 3d apps), the math that makes the images works in something called "linear" space. Okay . . . The problem comes from the fact that the images you're used to looking at generally come "corrected" or "adjusted", NOT in "linear" space. This is to compensate for the way computer monitors and tvs treat light vs. the way your eye see light. You've probably seen this idea either in calibrating your monitor or in a Photoshop image that's missing some info. The common space for monitor's correction is called sRBG (again you may have seen this term somewhere on your computer). Digital cameras and web photos, etc are usually all gamma corrected to sRGB (a value of 2.2), so they look correct to your eye. This gamma is basically the relationship of lights to darks (it's the center point slider in the levels control of photoshop). Correcting gamma to sRGB looks like it makes the image lighter, but it's actually more complex. It's really changing the gradient from dark to light. The blacks are still black and the whites are still white, but the stuff in the middle shifts brighter (sRGB or gamma 2.2) or darker (linear or gamma 1.0) to the eye. This comes into to play mostly when you're trying to render realistic images in a 3D program. Things don't work quite right.
So here's the basic, simplified deal (I'll show an example in one second).
I set up a scene with a few objects, each with an mia material and create an HDR environment. Here's what I get straight out of the box:
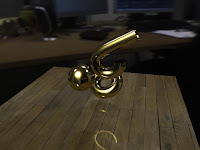 (click images for larger)
This is supposed to be correct, but when compared with what I think it should look like (based on the HDRI file), it's DARK.
Typically, one would just crank up the influence of the env HDRI or add some lights. But you shouldn't have to . . . that's the problem. Furthermore, the image is actually only too dark in the darker parts. That's because this image is LINEAR, and thus looks funny on your monitor. There is only one element of this image that actually matches what one would expect. That's the wooden floor. That's because this TIF file has already been gamma encoded (I know because it looks right in Preview, as I said most normal images are already gamma encoded). So Maya takes what you give it and computes and renders out in linear(dark) space.
To properly light and render this image, there are two steps (at it's most basic level):
Here's how I fixed the image above.
The first step is to "de-gamma" my texture file (the wood). Here's how. You should stick a Gamma Correct node in between the texture file and the material. Then connect the outColor of the image into the value of the Gamma Correct. Then change the "gamma" value of the correct node to 0.455 in all channels. This is to "de-gamma" the image (.45 is the inverse of the sRGB gamma, i.e. 1/2.2). Don't worry too much. 2.2 and 0.455 are really the only two numbers you need to know.
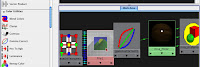
Repeat this step on every texture file you have. (there are other approaches, but this is the simplest.)
This is the image that you get now:
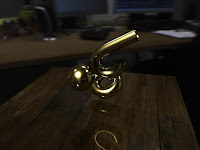
You'll notice that the only real difference is that the wood is actually darker. That was exactly the point. We want everything on the same page, the same working color space, in this case, linear. The image was looking dark and now the wood is equally as dark, because we removed the gamma correction that was built into the texture. Now we can add correction back (to sRGB) and the wood texture won't be brighter than the rest of the image. Got it?
Now let's add that correction back, this time onto the camera itself. Select the render cam and open it's attribute editor. Twirl down the "mental ray" tab and we're looking for the "lens shader" slot.
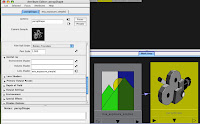
Click on the checker box of the "lens shader" slot and add (from the MR list) an mia_exposure_simple node (you could also use the photographic version of the exposure, but simple works fine for now). Open it's attributes and change the gamma to 2.2. (some people seem to like the look of 1.8 better, but that's a seperate issue). This is correcting to sRGB (the way you normally see images).
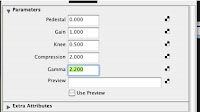
So anything this camera renders will get a gamma of 2.2 added (which is why we had to remove the gamma from the texture file, otherwise we'd double it up). Since everything in our scene has been working in linear space, the image should look much more like one would expect a photograph of our scene to look.
Here's the image with gamma correction.

The image is much "brighter" and softer. The brightness is actually all in the midtones. The white parts and the black parts are all the same, just the gamma has changed. Adding the sRGB gamma makes the physical properties of the image behave much more like a photograph to our eyes, which was the point. The wood is now in line with the rest of the image, as well, unlike our first pass. And I never touched a light or any other setting save the gammas!
So in short, there are two things to do for the basics:
1. remove gamma corrections from your texture files
2. add gamma correction to your camera for the renders.
whew.
NOTE: These images were rendered in preview quality and took about 5 seconds each. There was no retouching or anything at all.
One could easily work in this mode then remove the gamma (switch the gamma back to 1.0) and render to float images for later gamma correcting in a comping program, or use different workflows entirely, but this was the easiest way for me to understand this.
NEW NOTE (thanks andrew, from 3dlight): You can also adjust the gamma at the framebuffer in mental ray render globals, but this works inversely (to add gamma of 2.2 (make the image lighter), you would have to change the setting to 0.455). In that case, you would not need to add all of the gamma correct nodes to your textures, it would correct those all for you, but you would need to turn your lens shader gamma back to 1.0. There is some difference in terms of what happens depending on whether your textures and/or output are float or LDR, but I'll leave that be for now. You can certainly get better info on that from the links below.
Some good posts for more about this stuff are:
http://3dlight.blogspot.com/2008/09/linear-workflow-for-maya-mental-ray.html
http://www.djx.com.au/blog/2008/09/13/linear-workflow-and-gamma/
http://www.floze.org/2008/07/six-tuts-on-light-and-shade-part-i.html
This is called Linear Workflow . . . I'll give you the most simple version (and hope that I don't get that too wrong).
Basically, the gist is this. When you're working in Maya (or most other 3d apps), the math that makes the images works in something called "linear" space. Okay . . . The problem comes from the fact that the images you're used to looking at generally come "corrected" or "adjusted", NOT in "linear" space. This is to compensate for the way computer monitors and tvs treat light vs. the way your eye see light. You've probably seen this idea either in calibrating your monitor or in a Photoshop image that's missing some info. The common space for monitor's correction is called sRBG (again you may have seen this term somewhere on your computer). Digital cameras and web photos, etc are usually all gamma corrected to sRGB (a value of 2.2), so they look correct to your eye. This gamma is basically the relationship of lights to darks (it's the center point slider in the levels control of photoshop). Correcting gamma to sRGB looks like it makes the image lighter, but it's actually more complex. It's really changing the gradient from dark to light. The blacks are still black and the whites are still white, but the stuff in the middle shifts brighter (sRGB or gamma 2.2) or darker (linear or gamma 1.0) to the eye. This comes into to play mostly when you're trying to render realistic images in a 3D program. Things don't work quite right.
So here's the basic, simplified deal (I'll show an example in one second).
- the program works and renders linear images (hence "linear workflow")
- to look correct, images must be gamma corrected
- therefore, you should be gamma correcting your output images when you render in 3d
I set up a scene with a few objects, each with an mia material and create an HDR environment. Here's what I get straight out of the box:
 (click images for larger)
This is supposed to be correct, but when compared with what I think it should look like (based on the HDRI file), it's DARK.
Typically, one would just crank up the influence of the env HDRI or add some lights. But you shouldn't have to . . . that's the problem. Furthermore, the image is actually only too dark in the darker parts. That's because this image is LINEAR, and thus looks funny on your monitor. There is only one element of this image that actually matches what one would expect. That's the wooden floor. That's because this TIF file has already been gamma encoded (I know because it looks right in Preview, as I said most normal images are already gamma encoded). So Maya takes what you give it and computes and renders out in linear(dark) space.
To properly light and render this image, there are two steps (at it's most basic level):
- I'll de-gamma my textures. This will make EVERYTHING in plain old linear space up until we hit the camera.
- Then I'll add a gamma correction to the camera lens. Everything that then renders will be properly gamma corrected.
Here's how I fixed the image above.
The first step is to "de-gamma" my texture file (the wood). Here's how. You should stick a Gamma Correct node in between the texture file and the material. Then connect the outColor of the image into the value of the Gamma Correct. Then change the "gamma" value of the correct node to 0.455 in all channels. This is to "de-gamma" the image (.45 is the inverse of the sRGB gamma, i.e. 1/2.2). Don't worry too much. 2.2 and 0.455 are really the only two numbers you need to know.

Repeat this step on every texture file you have. (there are other approaches, but this is the simplest.)
This is the image that you get now:

You'll notice that the only real difference is that the wood is actually darker. That was exactly the point. We want everything on the same page, the same working color space, in this case, linear. The image was looking dark and now the wood is equally as dark, because we removed the gamma correction that was built into the texture. Now we can add correction back (to sRGB) and the wood texture won't be brighter than the rest of the image. Got it?
Now let's add that correction back, this time onto the camera itself. Select the render cam and open it's attribute editor. Twirl down the "mental ray" tab and we're looking for the "lens shader" slot.

Click on the checker box of the "lens shader" slot and add (from the MR list) an mia_exposure_simple node (you could also use the photographic version of the exposure, but simple works fine for now). Open it's attributes and change the gamma to 2.2. (some people seem to like the look of 1.8 better, but that's a seperate issue). This is correcting to sRGB (the way you normally see images).

So anything this camera renders will get a gamma of 2.2 added (which is why we had to remove the gamma from the texture file, otherwise we'd double it up). Since everything in our scene has been working in linear space, the image should look much more like one would expect a photograph of our scene to look.
Here's the image with gamma correction.

The image is much "brighter" and softer. The brightness is actually all in the midtones. The white parts and the black parts are all the same, just the gamma has changed. Adding the sRGB gamma makes the physical properties of the image behave much more like a photograph to our eyes, which was the point. The wood is now in line with the rest of the image, as well, unlike our first pass. And I never touched a light or any other setting save the gammas!
So in short, there are two things to do for the basics:
1. remove gamma corrections from your texture files
2. add gamma correction to your camera for the renders.
whew.
NOTE: These images were rendered in preview quality and took about 5 seconds each. There was no retouching or anything at all.
One could easily work in this mode then remove the gamma (switch the gamma back to 1.0) and render to float images for later gamma correcting in a comping program, or use different workflows entirely, but this was the easiest way for me to understand this.
NEW NOTE (thanks andrew, from 3dlight): You can also adjust the gamma at the framebuffer in mental ray render globals, but this works inversely (to add gamma of 2.2 (make the image lighter), you would have to change the setting to 0.455). In that case, you would not need to add all of the gamma correct nodes to your textures, it would correct those all for you, but you would need to turn your lens shader gamma back to 1.0. There is some difference in terms of what happens depending on whether your textures and/or output are float or LDR, but I'll leave that be for now. You can certainly get better info on that from the links below.
Some good posts for more about this stuff are:
http://3dlight.blogspot.com/2008/09/linear-workflow-for-maya-mental-ray.html
http://www.djx.com.au/blog/2008/09/13/linear-workflow-and-gamma/
http://www.floze.org/2008/07/six-tuts-on-light-and-shade-part-i.html
Subscribe to:
Posts (Atom)