Some some of the stuff I mentioned in the last video post about using Python. There's some very cool stuff out there to check out if you have the cajones to try to pull them apart a bit. Kudos to all these guys for making awesome stuff, THEN making it available to us all for free (for the most part)!
Hamish McKenzie - Zoo tools - I've mentioned him a bunch of times. Really great stuff in terms of tools and also on the blog. http://www.macaronikazoo.com/
CG Monks - Awesome toolset! http://www.cgmonks.com/
Mark Jackson - Red9 Tools - Holy moly! That's some heavy duty scripting stuff he's giving away! http://red9-consultancy.blogspot.com/
Morgan Loomis - http://morganloomis.com/downloads/
Michael Comet - http://www.comet-cartoons.com/
Brendan Ross - http://www.supercrumbly.com/latest.php
Showing posts with label scripts. Show all posts
Showing posts with label scripts. Show all posts
Wednesday, June 05, 2013


Some Python in Maya basics
I've been working a ton lately, so sorry for the lack of posts. Some day I'll figure out how to do smaller things a little more regularly.
Annnyyyywayyys . . . On the last job I was on (and in a rigging class I taught recently), I was demo-ing some little scripts I'd written and realized that I'd forgotten how confusing it can be to run python stuff in Maya if you don't have any experience doing it or know why things are done the way they are. In fact, I recall being able to put together a fairly competent script in python (cuz I knew a bunch of MEL already) and actually not knowing how to run it in maya! So I would just copy and paste the whole thing to the script editor each time or make a button out of the whole code. . . until I was like "What the hell am I doing? Figure this out!". Turns out it wasn't too hard, but it can be a bit confusing sometimes, certainly at the beginning and so I made a couple of quick videos walking through a few things you might want to know about how (and occasionally why) you do things in Maya with Python. Absolutely nothing fancy or tricky here, just the basics for those of you who haven't quite wrapped your heads around it.
Two videos: the first one is the really basic stuff (importing a module and running a function from it) and the second goes into a few other areas that are a bit more advanced (reloading scripts, what those .pyc files are and how they can trip you up sometimes, messing with the python path [sys.path] to load files from other folders, setting up a package in python and so on).
BTW, I've done a dump of some scripts onto the Downloads page above ^, and I'll do a quick video walkthrough of them in short order
Maya/Python: The basics of using python scripts in Maya (Pt 1) from zeth willie on Vimeo.
Maya/Python: The basics of using python scripts in Maya (Pt 2) from zeth willie on Vimeo.
Annnyyyywayyys . . . On the last job I was on (and in a rigging class I taught recently), I was demo-ing some little scripts I'd written and realized that I'd forgotten how confusing it can be to run python stuff in Maya if you don't have any experience doing it or know why things are done the way they are. In fact, I recall being able to put together a fairly competent script in python (cuz I knew a bunch of MEL already) and actually not knowing how to run it in maya! So I would just copy and paste the whole thing to the script editor each time or make a button out of the whole code. . . until I was like "What the hell am I doing? Figure this out!". Turns out it wasn't too hard, but it can be a bit confusing sometimes, certainly at the beginning and so I made a couple of quick videos walking through a few things you might want to know about how (and occasionally why) you do things in Maya with Python. Absolutely nothing fancy or tricky here, just the basics for those of you who haven't quite wrapped your heads around it.
Two videos: the first one is the really basic stuff (importing a module and running a function from it) and the second goes into a few other areas that are a bit more advanced (reloading scripts, what those .pyc files are and how they can trip you up sometimes, messing with the python path [sys.path] to load files from other folders, setting up a package in python and so on).
BTW, I've done a dump of some scripts onto the Downloads page above ^, and I'll do a quick video walkthrough of them in short order
Maya/Python: The basics of using python scripts in Maya (Pt 1) from zeth willie on Vimeo.
Maya/Python: The basics of using python scripts in Maya (Pt 2) from zeth willie on Vimeo.
Friday, January 25, 2013
Python append to path tool
Here is a little script that allows you to browse for and select paths to add to your sys.path list for python.
I generally don't keep my python scripts (at least the ones I write myself) in my scripts folder, I keep them in one of a couple "Git" folders that allow me to easily load/sync my scripts over GitHub so I can work on them on various computers (I suppose I could arrange things so that my scripts stay separate from all the other script in my scripts folder and point Git there, but I don't).
This works fine for me, but it's a bit a pain to have to keep pointing Maya there to look for my Python scripts. Up til I wrote this script I just wrote a little bit of python code in Maya to append to my sys.path and just copied that to the shelf. No problem. Unless I'm on another computer at home or at a studio. Still not a big deal, but I still have to put the scripts somewhere and point Maya there, and when I'm at a studio I often have stuff in a few places (desktop, folder on the desktop, etc). And I'm so lazy that I think it's a pain to grab the path name to add it to the "sys.path.append(pathName)" in Maya (especially on a Mac). So I wrote this.
Basically, it has two parts (the two tabs). The first part lets you browse for up to three paths and then add em with a click. It dummy checks that a) you've added something and b) what you've added is actually a path that exists.
 The second tab is just a quick list of the paths that Maya is currently looking in, it refreshes once you've added new paths or you can manually refresh it if you've added paths elsewhere. Since I didn't want to make this window soooo big that it could catch any potential long path names, if you double click on a path in the "View Paths" tab, it will print that name in the script editor.
 There's also the option in the menu bar to save out your entered paths (it will write a "zbw_appendPathSave.txt" file to your user prefs folder). You can then load it later to save some time (it will just overwrite itself if necessary) and it will reload the paths you've browsed for.
Here's a link to the script or it's in the NEW downloads section above. (note: slowly but surely I'll get the other scripts up there too)
Basically, I just drop this in my scripts folder (it's the only python script I keep there, except for stuff that might point Maya elsewhere) and run it from my shelf. Here's the code to do call the script (obviously python):
Hope it's useful to someone as lazy as me!
I generally don't keep my python scripts (at least the ones I write myself) in my scripts folder, I keep them in one of a couple "Git" folders that allow me to easily load/sync my scripts over GitHub so I can work on them on various computers (I suppose I could arrange things so that my scripts stay separate from all the other script in my scripts folder and point Git there, but I don't).
This works fine for me, but it's a bit a pain to have to keep pointing Maya there to look for my Python scripts. Up til I wrote this script I just wrote a little bit of python code in Maya to append to my sys.path and just copied that to the shelf. No problem. Unless I'm on another computer at home or at a studio. Still not a big deal, but I still have to put the scripts somewhere and point Maya there, and when I'm at a studio I often have stuff in a few places (desktop, folder on the desktop, etc). And I'm so lazy that I think it's a pain to grab the path name to add it to the "sys.path.append(pathName)" in Maya (especially on a Mac). So I wrote this.
Basically, it has two parts (the two tabs).
 The first part lets you browse for up to three paths and then add em with a click. It dummy checks that a) you've added something and b) what you've added is actually a path that exists.
 There's also the option in the menu bar to save out your entered paths (it will write a "zbw_appendPathSave.txt" file to your user prefs folder). You can then load it later to save some time (it will just overwrite itself if necessary) and it will reload the paths you've browsed for.
Here's a link to the script or it's in the NEW downloads section above. (note: slowly but surely I'll get the other scripts up there too)
Basically, I just drop this in my scripts folder (it's the only python script I keep there, except for stuff that might point Maya elsewhere) and run it from my shelf. Here's the code to do call the script (obviously python):
import zbw_appendPath
zbw_appendPath.appendPath()
Hope it's useful to someone as lazy as me!
Shape node scaling tool
Here's a little thing that I made a while ago as a little hacked-together tool for some job I was working on. Eventually I added little bits until it ended up as this kind of done-ish version. (I know that's a real sales job, isn't it?:)
But it actually is pretty useful to me on a regular basis for everyday stuff, especially for scaling controls. The short description is that this grabs all of the components of each selected object (surfaces, curves and polys) and scales them. That is, your objects gets scaled without affecting the scale attributes or the transform node.
The setup looks a bit confusing (and maybe it is), but there are a few things you can do. There are two ways to scale things, either drag the slider (which will automatically recenter itself. Kind of weird, but I felt it gave better sensitivity and still allowed me to scale things very large with a few pulls) or type a number and press "scale". When you use the slider, the value that you slid gets entered into the field, so you can repeat it on the same object by clicking the scale button, or use the same value for other objects.
 The stuff on the right is a bit more esoteric. What was happening was that I would scale a bunch of controls and then realize that I forgot to select one control. It was then tricky to repeat the same slider values, etc. So the top field on the right tracks the cumulative value change to the scales. So you can select a bunch of objects, change the values arbitrarily and this will keep track of the changes from where you started. You can then copy down that number and enter it into the text field if you need to grab another object and match it, though this will then change your tracked value. To get around that, you can "reset" the tracked value back to 100% once you select a new object(s). Similarly, if you do a bunch of scaling it can be tough to get back to the original value without hitting undo a bunch of times. So if you've tracked your changes (by starting with a "change" value of 100, via "reset") you can get back to the original state with the "orig" button (it will just figure out what you need to get back to 100% scale and multiply by that). This change will then be reflected in the "scale %" field if you want to apply it to something else (or just know what the number is).
Whew. Sounds like a lot for a simple tool, but I feel like maybe the naming, etc isn't super clear. Maybe at some point I'll put a "help" menu in there or something. . .
Hope it's useful!
import zbw_shapeScale
zbw_shapeScale.shapeScale()
Friday, January 11, 2013
The basics of O.O.P. in Maya/Python
I was thinking about calling this post "O.O.P. I did it again!", but then I realized that most people in 3D nowadays are too young to remember who Britanny Spears was (you bastards). . .Made this video (along with a couple of others) a few months ago, but never got around to posting it. Just got really busy and/or forgot.
For those that don't know, OOP refers to Object Oriented Programming.This is just a basic overview of what that is and how you can start thinking about it in Maya using Python. It's something that was a bit confusing to me when I was first learning Python, some of it still is a little bit . . .
I really have no idea whether this video even makes any sense (in terms of it being a useful/illustrative thing to watch).
Here's a description of a particular type of person:
"I work in Maya and know a little about programming, probably MEL and maybe some Python, and also write enough code to care about digging deeper, but definitely not accomplished enough in Python (or any other OO language) to the point when a discussion of classes seems rudimentary."
If that describes you, then you're who I made this for! I certainly hope both of you enjoy it.
(p.s. I was going to make a venn diagram for that, but I feel like Randall Munroe/xkcd should be the only person in the world allowed to make those anymore. And while we're on the topic, this is my new favorite site. If you're even a little bit of a nerd, you must read them all.)
Here's the vid:
Maya/Python: The basics of using Classes and Obj. Oriented Progamming in Maya/Python from zeth willie on Vimeo.
For those that don't know, OOP refers to Object Oriented Programming.This is just a basic overview of what that is and how you can start thinking about it in Maya using Python. It's something that was a bit confusing to me when I was first learning Python, some of it still is a little bit . . .
I really have no idea whether this video even makes any sense (in terms of it being a useful/illustrative thing to watch).
Here's a description of a particular type of person:
"I work in Maya and know a little about programming, probably MEL and maybe some Python, and also write enough code to care about digging deeper, but definitely not accomplished enough in Python (or any other OO language) to the point when a discussion of classes seems rudimentary."
If that describes you, then you're who I made this for! I certainly hope both of you enjoy it.
(p.s. I was going to make a venn diagram for that, but I feel like Randall Munroe/xkcd should be the only person in the world allowed to make those anymore. And while we're on the topic, this is my new favorite site. If you're even a little bit of a nerd, you must read them all.)
Here's the vid:
Maya/Python: The basics of using Classes and Obj. Oriented Progamming in Maya/Python from zeth willie on Vimeo.
Thursday, January 10, 2013
One more FINAL thing about the autoswim fishy . . .
Since a few people have asked about the sine function and such involved here based on this, just wanted to point out that Tomasso let me know about a post he did re: some of the mathy madness involved in changing the periodicity of the sine function on the fly. Thanks Tomasso!
And as I suspected, it's way more than I'm willing to deal with . . .
http://www.tommasosanguigni.it/blog/?p=40
And as I suspected, it's way more than I'm willing to deal with . . .
http://www.tommasosanguigni.it/blog/?p=40
Wednesday, August 15, 2012
Space Switching and Space Matching
I created a couple of new videos to talk about space switching and space matching. I think they're pretty self-explanatory, just going over the basics of what they are and some ways to set them up. Nothing too crazy, though the space matching one is a fair amount of python scripting (though again, nothing terribly hard if you're already using python).
But if you're into the more complicated bits, here are some links to info about them:
Charles Looker - http://charleslooker.wordpress.com/2012/02/25/multi-directional-constraints/
Hamish McKenzie - http://www.macaronikazoo.com/?page_id=413 (very illustrative, but be warned, some of his matrix math stuff used his own scripts to deal with the matrices, so it can be a bit confusing if you try to do it without installing his scripts first. But the principles are the same, I just use the API to do the matrix-y bits, which can be hella confusing in it's own right)
TD Matt - http://td-matt.blogspot.com/2010/12/broken-hierarchy-rig-and-space.html
Oh yeah, and the vids by Jeremy Ernst are here: https://vimeo.com/jernst. Good stuff!
And I'll say it just so you don't have to. . . My god am I long winded! Not sure how explaining space switching could possibly take that long. But what can you do? :)
Maya/Rigging: The basics of space switching from zeth willie on Vimeo.
Maya/Rigging: Space Matching from zeth willie on Vimeo.
But if you're into the more complicated bits, here are some links to info about them:
Charles Looker - http://charleslooker.wordpress.com/2012/02/25/multi-directional-constraints/
Hamish McKenzie - http://www.macaronikazoo.com/?page_id=413 (very illustrative, but be warned, some of his matrix math stuff used his own scripts to deal with the matrices, so it can be a bit confusing if you try to do it without installing his scripts first. But the principles are the same, I just use the API to do the matrix-y bits, which can be hella confusing in it's own right)
TD Matt - http://td-matt.blogspot.com/2010/12/broken-hierarchy-rig-and-space.html
Oh yeah, and the vids by Jeremy Ernst are here: https://vimeo.com/jernst. Good stuff!
And I'll say it just so you don't have to. . . My god am I long winded! Not sure how explaining space switching could possibly take that long. But what can you do? :)
Maya/Rigging: The basics of space switching from zeth willie on Vimeo.
Maya/Rigging: Space Matching from zeth willie on Vimeo.
Friday, July 13, 2012
Question about tranforms on a frozen object. . .
A fella named Jason emailed me at Vimeo with a question about the IK 2 FK snapping video I did (here):
"I'm a student over at rigging dojo and my mentor turned me towrds your ik fk snapping tool that you created. The script works great. But I would ask how do you handle ctrl curves when they have been say zeroed out at (5,5,5) but when I query there position i get back (0,0,0) and when i apply the proper cordinates to the ctrl curve it goes the right amount but because it was zeroed out it isn't right... Any help would be appreciated"
Thought it was a good question (as I would expect from Rigging Dojo!) and thought it was worth talking about for two reasons: 1) the problem/solution are kind of interesting (if you're into this kinda thing) and 2) it reinforces some stuff I've said in the past, which bears repeating. Namely, you're kinda doing it wrong.
{slight digression (would make it footnote if knew how). . . When I say "wrong" here I'm using the term loosely. That is, you may have valid reasons for doing whatever you're doing and in your case it may make sense, BUT in most ordinary circumstances, you're probably creating more trouble than you're saving. end of digression}
So second things first . . . What is "wrong" and why?:
It has to do with freezing your transforms. And THAT has to do with the Matrix ("whooa . . ."). Each object has a transformation matrix that basically keeps track of where the object is in space, how it's rotated, scaled, etc. I won't make a fool out of you and me by trying to explain it in detail (Hamish Mckenzie has some cool posts on his blog about it), cuz I don't know it that well. But what happens, more or less, when you freeze transforms is that you "reset" the objects matrix (or perhaps more accurately, offset the matrix) and tell it that where it is NOW is at 0, 0, 0. In the ordinary course of events, that may work, but when you come in with your cheeky little scripts and try to tell it to go somewhere specific, as you've discovered, there's a problem and Maya doesn't know what you mean (or again, to be more precise, Maya knows exactly what's going on, YOU don't know what you mean, or least I don't).
So that's what I mean when I say you're doing it wrong. Freezing transforms on controls is usually NOT the best way to zero them out. A much better way is to "group orient" them (some people call it "group freezing"). I even did a post and a video on the process. In short, you create your control at 0,0,0 and immediately group it. Then take the group and move THAT to the correct location + orientation, either with constraints that you then delete or better yet with "xform" and math and scripts and such. But you get two nice benefits: 1) the control stays at 0,0,0 because it's parented under the group that's doing all the moving and 2) because the control's matrix is then inheriting it's information from the group (which DOES have all the correct info with no offsets), both you and Maya are talking about the same world space, etc. and things like "xform" and "move" and stuff should work fine.
Sooooo. . . what if (as I imagine is the case) you've already done the freezing on your control and don't want to go back. Can you still use the IK2FK python code? The answer is "yes" (though I would recommend fixing the control using group orienting and being done with it. . .).
There are actually a few ways I would imagine. I read somewhere once that Maya stores the freeze transform offset matrix somewhere. I also bet that there's some way to get all smartypants and mathy and solve the problem by busting out some matrix voodoo. But since I can't do that (yet?), I can only offer a solution that will solve the translate problem the same way we did the rest of the script, with a lil elbow grease and vector math. It's not that hard:
Basically, the trick is to find the world space position of the IK control. If you just xform the transform node (the object), it obviously returns a weird value cuz the matrix has been offset. So instead, you need to do something like:
So all we're doing is figuring out the difference between the world space of the ik ctrl (trueIK) and the values the maya is giving us for the frozen transform (frozenIK) and applying that difference to the fk wrist position to get the final destination of the ik ctrl. This should also work when you HAVEN'T frozen the transforms (since the offset would then be 0).
Whew. Hope that makes sense ...
"I'm a student over at rigging dojo and my mentor turned me towrds your ik fk snapping tool that you created. The script works great. But I would ask how do you handle ctrl curves when they have been say zeroed out at (5,5,5) but when I query there position i get back (0,0,0) and when i apply the proper cordinates to the ctrl curve it goes the right amount but because it was zeroed out it isn't right... Any help would be appreciated"
Thought it was a good question (as I would expect from Rigging Dojo!) and thought it was worth talking about for two reasons: 1) the problem/solution are kind of interesting (if you're into this kinda thing) and 2) it reinforces some stuff I've said in the past, which bears repeating. Namely, you're kinda doing it wrong.
{slight digression (would make it footnote if knew how). . . When I say "wrong" here I'm using the term loosely. That is, you may have valid reasons for doing whatever you're doing and in your case it may make sense, BUT in most ordinary circumstances, you're probably creating more trouble than you're saving. end of digression}
So second things first . . . What is "wrong" and why?:
It has to do with freezing your transforms. And THAT has to do with the Matrix ("whooa . . ."). Each object has a transformation matrix that basically keeps track of where the object is in space, how it's rotated, scaled, etc. I won't make a fool out of you and me by trying to explain it in detail (Hamish Mckenzie has some cool posts on his blog about it), cuz I don't know it that well. But what happens, more or less, when you freeze transforms is that you "reset" the objects matrix (or perhaps more accurately, offset the matrix) and tell it that where it is NOW is at 0, 0, 0. In the ordinary course of events, that may work, but when you come in with your cheeky little scripts and try to tell it to go somewhere specific, as you've discovered, there's a problem and Maya doesn't know what you mean (or again, to be more precise, Maya knows exactly what's going on, YOU don't know what you mean, or least I don't).
So that's what I mean when I say you're doing it wrong. Freezing transforms on controls is usually NOT the best way to zero them out. A much better way is to "group orient" them (some people call it "group freezing"). I even did a post and a video on the process. In short, you create your control at 0,0,0 and immediately group it. Then take the group and move THAT to the correct location + orientation, either with constraints that you then delete or better yet with "xform" and math and scripts and such. But you get two nice benefits: 1) the control stays at 0,0,0 because it's parented under the group that's doing all the moving and 2) because the control's matrix is then inheriting it's information from the group (which DOES have all the correct info with no offsets), both you and Maya are talking about the same world space, etc. and things like "xform" and "move" and stuff should work fine.
Sooooo. . . what if (as I imagine is the case) you've already done the freezing on your control and don't want to go back. Can you still use the IK2FK python code? The answer is "yes" (though I would recommend fixing the control using group orienting and being done with it. . .).
There are actually a few ways I would imagine. I read somewhere once that Maya stores the freeze transform offset matrix somewhere. I also bet that there's some way to get all smartypants and mathy and solve the problem by busting out some matrix voodoo. But since I can't do that (yet?), I can only offer a solution that will solve the translate problem the same way we did the rest of the script, with a lil elbow grease and vector math. It's not that hard:
Basically, the trick is to find the world space position of the IK control. If you just xform the transform node (the object), it obviously returns a weird value cuz the matrix has been offset. So instead, you need to do something like:
cmds.xform(ctrlName, q=True, rp=True)
which will instead use something that's not part of the matrix business (rp is for the rotate pivot point). This will give you the world space of the object. When you compare THAT to the actual value you get from "xform" of the control, it gives you how far "off" you are from Maya's interpretation of the location. You now just need to know where to move it to, and since you've got the offset value, you just need to subtract THAT from the location of the FK ctrl to get the number you'd need to move the transform of the IK ctl. So putting those together and assuming everything else in the script is the same, the section where you move the IK wrist would look like this:#snap IK ctrl to wrist position
trueIKraw = cmds.xform(ikWrist, ws=True, q=True, rp=True) #get IK pos in true ws
trueIK = om.MVector(trueIKraw[0], trueIKraw[1],trueIKraw[2]) #make it a vector
frozenIKraw = cmds.xform(ikWrist, q=True, t=True) #get IK pos via matrix
frozenIK = om.MVector(frozenIKraw[0], frozenIKraw[1],frozenIKraw[2]) #make vector
offset = trueIK - frozenIK #get the offset value for the Ik ctrl
correctedFw = fw - offset #this modifies the fk pos to account for the offset
cmds.move(correctedFw.x, correctedFw.y, correctedFw.z, ikWrist, ws=True)
So all we're doing is figuring out the difference between the world space of the ik ctrl (trueIK) and the values the maya is giving us for the frozen transform (frozenIK) and applying that difference to the fk wrist position to get the final destination of the ik ctrl. This should also work when you HAVEN'T frozen the transforms (since the offset would then be 0).
Whew. Hope that makes sense ...
Thursday, July 12, 2012
Script for creating/editing message attrs . . .
I know I mentioned it in the 3rd part of the IK/FK snapping videos, so here it is for those of you who might be inclined to use it, the message mapping script . . .
If you're not sure what I'm talking about re: message attrs, watch this or look it up, sucka.
Here it is! zbw_messageMapper or go to the Downloads page above. . .
There are 2 tabs here:
 The first tab is for creating message attributes.
Select the object you want to add the message attrs to (the "base object") and click the "choose object" button to add it to the text field.
Click "add new attrs" to create a row that will allow you to type in the attr name and select the object the you want to send a message to that attr. You can do multiple attrs at a time, btw. If you want to delete the last row you created, click the red button (this just deletes the UI part, not any attrs). Once you've got what you need entered, then click the green button and the magic will happen. (it's really boring magic). A bit of text will pop up letting you know what you've got has been added and any problems or warnings should show up in your script editor. It will also run down what attr have been connected to what in the script editor.
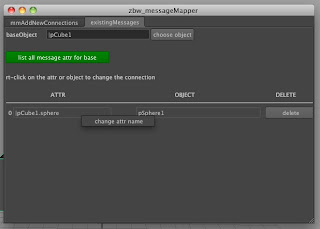 The second tab is reviewing what message attrs you have on your selected base obj.
Select your base the same way you did in the last tab and click "list all message attrs". Any attributes of type "message" (however they were created) will be listed below in columns, one for the attr, one for the connected obj, if any, and a delete button.
The delete button is obvious, I hope, but if you right click on either of the other two columns you'll get a little menu giving you the option to change the name of the attr or change the obj connected to that attr. Clicking on either will open up a little window that gives you opportunity to change the respective end of the connection (and obviously reconnect things when done).
That's about it. I taken care of most of the dummy checking here (i.e. what happens when there are no message attrs or when you leave a field empty, etc), but there may be some situation that spits out an error or something. Be aware that creation side will force connect things, so it will overwrite any attrs that have the same name. It will show this warning in the script editor (though it just does anyways. Ha!). It will also show a little text message in the main window once you've created the messages, which will disappear when you change base objs. I chose not to reset the fields back to empty in case you wanted to do multiple base obj with the same attrs.
Hope it's useful to someone. And let me know if there are any big problems. I may try to fix them, you never know.
To run it, put it into your python scripts folder (maya doesn't automatically read all scripts folders for python files) and type:
You can drag that code to your shelf and run it from a button there.
If you're not sure what I'm talking about re: message attrs, watch this or look it up, sucka.
Here it is! zbw_messageMapper or go to the Downloads page above. . .
There are 2 tabs here:

Select the object you want to add the message attrs to (the "base object") and click the "choose object" button to add it to the text field.
Click "add new attrs" to create a row that will allow you to type in the attr name and select the object the you want to send a message to that attr. You can do multiple attrs at a time, btw. If you want to delete the last row you created, click the red button (this just deletes the UI part, not any attrs). Once you've got what you need entered, then click the green button and the magic will happen. (it's really boring magic). A bit of text will pop up letting you know what you've got has been added and any problems or warnings should show up in your script editor. It will also run down what attr have been connected to what in the script editor.

Select your base the same way you did in the last tab and click "list all message attrs". Any attributes of type "message" (however they were created) will be listed below in columns, one for the attr, one for the connected obj, if any, and a delete button.
The delete button is obvious, I hope, but if you right click on either of the other two columns you'll get a little menu giving you the option to change the name of the attr or change the obj connected to that attr. Clicking on either will open up a little window that gives you opportunity to change the respective end of the connection (and obviously reconnect things when done).
That's about it. I taken care of most of the dummy checking here (i.e. what happens when there are no message attrs or when you leave a field empty, etc), but there may be some situation that spits out an error or something. Be aware that creation side will force connect things, so it will overwrite any attrs that have the same name. It will show this warning in the script editor (though it just does anyways. Ha!). It will also show a little text message in the main window once you've created the messages, which will disappear when you change base objs. I chose not to reset the fields back to empty in case you wanted to do multiple base obj with the same attrs.
Hope it's useful to someone. And let me know if there are any big problems. I may try to fix them, you never know.
To run it, put it into your python scripts folder (maya doesn't automatically read all scripts folders for python files) and type:
import zbw_messageMapper

zbw_messageMapper.messageMapper()
You can drag that code to your shelf and run it from a button there.
Tuesday, July 03, 2012
IK to FK snapping
These videos are about how you might approach and execute IK to FK snapping. (For those that don't know or use different terminology, that's where you run a script and it snaps your IK limb position to your FK limb position). It's something that I had always looked at as a bit of luxury, something to get to if there was time when building a rig (hint: there rarely was time). As I mention in the video, Michael Cawood pointed out to me that it is actually a time saver when you're doing a lot of quick blocking. If you pose your characters in IK mode in blocking, you have a lot less counter animation to do when you change the body rotations, for example. You can pose away in IK, then switch to FK when it comes time to animate (if you need to switch, that is). As I was one of the lead animators on that job with Michael, not a rigger (thank god, there were 50+ characters for that one), I didn't bother to offer up my services:) But I thought it would be a good topic for a video tute, so here it is. . .
There are 3 parts. 1) covers the basic idea and some rudimentary vector math 2) covers the python scipting of those concepts in Maya and 3) introduces "message attributes" which are nifty little attrs that can be really useful to bump up functionality of your rigs/scripts.
Maya/Rigging: IK to FK snapping, part 1 from zeth willie on Vimeo.
Maya/Rigging: IK to FK snapping, part 2 from zeth willie on Vimeo.
Maya/Rigging: IK to FK snapping, part 3 from zeth willie on Vimeo.
Oh, yeah. Here is the code for the basic version of the IK/FK script in python (the script using the message attrs will depend on your specific attr names):
Once I get the little things hammered out in the zbw_messageMapper script that I showed in the video, I'll post that up too. . .
EDIT: One more thing! Here's the link to Ryan Trowbridge's site. http://www.rtrowbridge.com/blog/ Not sure how to access individual posts, but the post from March 09 has the video of the MasterClass on Vector Math in Maya. Good stuff. Also just bought his book on Python for Games and Film. Can't wait to read it!
There are 3 parts. 1) covers the basic idea and some rudimentary vector math 2) covers the python scipting of those concepts in Maya and 3) introduces "message attributes" which are nifty little attrs that can be really useful to bump up functionality of your rigs/scripts.
Maya/Rigging: IK to FK snapping, part 1 from zeth willie on Vimeo.
Maya/Rigging: IK to FK snapping, part 2 from zeth willie on Vimeo.
Maya/Rigging: IK to FK snapping, part 3 from zeth willie on Vimeo.
Oh, yeah. Here is the code for the basic version of the IK/FK script in python (the script using the message attrs will depend on your specific attr names):
import maya.cmds as cmds
import maya.OpenMaya as om

#select the joints we need
sel = cmds.ls(sl=True)

#assign selection
fkWrist = sel[0]
fkShldr = sel[1]
fkElbow = sel[2]
ikWrist = sel[3]
ikPv = sel[4]

#get positions from fk
fkwRaw = cmds.xform(fkwrist, ws=True, q=True, t=True)
fkwPos = om.MVector(fkwRaw[0], fkwRaw[1], fkwRaw[2])

fkeRaw = cmds.xform(fkelbow, ws=True, q=True, t=True)
fkePos = om.MVector(fkeRaw[0], fkeRaw[1], fkeRaw[2])

fksRaw = cmds.xform(fkshldr, ws=True, q=True, t=True)
fksPos = om.MVector(fksRaw[0], fksRaw[1], fksRaw[2])

#set position of IK wrist ctrl
cmds.move(fkwPos.x, fkwPos.y, fkwPos.z, ikwrist)

#start figuring out pole vector pos

#find avg (midpoint) of shoulder and wrist
midpoint = (fkwPos + fksPos) / 2

#find pv direction
pvOrigin = fkePos - midpoint

#extend that length
pvRaw = pvOrigin * 2


#position pvRaw at midpoint
pvPos = pvRaw + midpoint

#stick pole vector at pvPos
cmds.move(pvPos.x, pvPos.y, pvPos.z, ikpv)
Once I get the little things hammered out in the zbw_messageMapper script that I showed in the video, I'll post that up too. . .
EDIT: One more thing! Here's the link to Ryan Trowbridge's site. http://www.rtrowbridge.com/blog/ Not sure how to access individual posts, but the post from March 09 has the video of the MasterClass on Vector Math in Maya. Good stuff. Also just bought his book on Python for Games and Film. Can't wait to read it!
Friday, June 15, 2012
transfer UV's follow up . . .
A little while ago Nasheet posted a comment about solving some of the issues people were having with the transferUV script I posted here:
"""
It worked well for most of the meshes in my scene, but I did get the same error as teezy5 for a couple of them, and I think I found a solution. The error was thrown from:
`getAttr ($targetOrig+".intermediateObject")`;
The problem in my case was that there was more than one object named '$targetOrig' in my scene, and thus the return value of the 'getAttr' was an int[] containing the intermediateObject values for all matching objects, instead of just an int. In order to only get the unique intermediateObject for the selected geometry, 'listRelatives' needs to return the full dagpath. Basically, I just changed the line:
string $targetShapes[] = `listRelatives-s $target`;
to
string $targetShapes[] = `listRelatives-s -f $target`;
And it worked. That's it! Thank you again!
"""
Haven't had a chance to play with it, but sounds right to me. . .
Thanks Nasheet!
Here's the fixed script: zbw_cleanTransferUV.mel
"""
It worked well for most of the meshes in my scene, but I did get the same error as teezy5 for a couple of them, and I think I found a solution. The error was thrown from:
`getAttr ($targetOrig+".intermediateObject")`;
The problem in my case was that there was more than one object named '$targetOrig' in my scene, and thus the return value of the 'getAttr' was an int[] containing the intermediateObject values for all matching objects, instead of just an int. In order to only get the unique intermediateObject for the selected geometry, 'listRelatives' needs to return the full dagpath. Basically, I just changed the line:
string $targetShapes[] = `listRelatives-s $target`;
to
string $targetShapes[] = `listRelatives-s -f $target`;
And it worked. That's it! Thank you again!
"""
Haven't had a chance to play with it, but sounds right to me. . .
Thanks Nasheet!
Here's the fixed script: zbw_cleanTransferUV.mel
Thursday, May 10, 2012
Autoswim-fish-expressions follow up . . .
A couple of months ago I had someone (Patrice Berube) e-mail me a question about some of the behavior in the autoswim fish rig. Been pretty busy with work and all so never got around to posting about the issue . . .
Basically, the problem was when one animated the frequency of the swimming fish (whole or part), over the frames where the animation occurs the sine wave function would freak out, go super fast, super slow, backwards, etc.
Since the rig was made remotely for a studio, I never really got a chance to play with it too much once I made it and no one ever brought up the issue (I actually knew more or less what the animation would be, and animating the frequency never really entered into it. I also suspect that a lot of the animation was done on the FK controls). But once Patrice pointed out what the issue he was having, the problem became more clear.
Essentially, through all of the expressions and such, time was constant (or moving constantly), but changing the frequency as time progressed would give kind of random values as you passed through the progression of frames (essentially, the sin values no longer had any sensible relationship to the values from the previous frame). My first reaction was, "uh oh! This will take some of that crazy math stuff to solve". But as we batted around a couple of emails about, we both kind of arrived at a similar solutions that were a bit more palatable (though I'd still like to know a math-y solution, I can't be bothered at this point).
Here's the problem illustrated:

As you can see, the values that are coming out of the sine function (which is the basis for the joint rotation) are fine if you don't animate the freq. Predictable values, each frame (in this case) changing by a value of 1 in oscillating directions.
But when you animate the freq it looks like it should make sense, but the values kind of suck. Starts out fine (delta of 1. Look I'm using mathy terms!), but then the changes become really unpredictable, sometimes almost 2, sometimes about zero. So the animation would look crazy.
As it turns out the solution Patrice and I both realized independently (with Patrice actually implementing it, rather than just thinking about it :) is that rather than getting hard-core on the math, you could simply take the constant time out of the equation and not worry so much about animating the frequency. Instead, if you create an attribute to take the place of time (I thought to call it "time", he thought to call it "swimspeed". His is better) and simply animate that to make your fish swim, it would solve the problem. So in your expressions you'd simply replace "frame" with $swimspeed (which pulls the value of that attr), you could speed up or slow down the sine wave without fussing with the global frequency. A linear curve for "swimspeed" equals some version of normal time and messing with that curve will give you faster or slower time (as far as the fish rig is concerned).
Note that you'd still have problems if you tried to animate the frequency of the individual controls (because those frequencies would be animated relative to the new "swimspeed" attr). But that's less of an issue. You can just set those frequencies to be whatever you'd like, per control and control the rest of the animation globally.
Hope that helps anyone having this issue and big thanks to Patrice for pointing it out and working through the problem!
Basically, the problem was when one animated the frequency of the swimming fish (whole or part), over the frames where the animation occurs the sine wave function would freak out, go super fast, super slow, backwards, etc.
Since the rig was made remotely for a studio, I never really got a chance to play with it too much once I made it and no one ever brought up the issue (I actually knew more or less what the animation would be, and animating the frequency never really entered into it. I also suspect that a lot of the animation was done on the FK controls). But once Patrice pointed out what the issue he was having, the problem became more clear.
Essentially, through all of the expressions and such, time was constant (or moving constantly), but changing the frequency as time progressed would give kind of random values as you passed through the progression of frames (essentially, the sin values no longer had any sensible relationship to the values from the previous frame). My first reaction was, "uh oh! This will take some of that crazy math stuff to solve". But as we batted around a couple of emails about, we both kind of arrived at a similar solutions that were a bit more palatable (though I'd still like to know a math-y solution, I can't be bothered at this point).
Here's the problem illustrated:

As you can see, the values that are coming out of the sine function (which is the basis for the joint rotation) are fine if you don't animate the freq. Predictable values, each frame (in this case) changing by a value of 1 in oscillating directions.
But when you animate the freq it looks like it should make sense, but the values kind of suck. Starts out fine (delta of 1. Look I'm using mathy terms!), but then the changes become really unpredictable, sometimes almost 2, sometimes about zero. So the animation would look crazy.
As it turns out the solution Patrice and I both realized independently (with Patrice actually implementing it, rather than just thinking about it :) is that rather than getting hard-core on the math, you could simply take the constant time out of the equation and not worry so much about animating the frequency. Instead, if you create an attribute to take the place of time (I thought to call it "time", he thought to call it "swimspeed". His is better) and simply animate that to make your fish swim, it would solve the problem. So in your expressions you'd simply replace "frame" with $swimspeed (which pulls the value of that attr), you could speed up or slow down the sine wave without fussing with the global frequency. A linear curve for "swimspeed" equals some version of normal time and messing with that curve will give you faster or slower time (as far as the fish rig is concerned).
Note that you'd still have problems if you tried to animate the frequency of the individual controls (because those frequencies would be animated relative to the new "swimspeed" attr). But that's less of an issue. You can just set those frequencies to be whatever you'd like, per control and control the rest of the animation globally.
Hope that helps anyone having this issue and big thanks to Patrice for pointing it out and working through the problem!
Wednesday, February 29, 2012
Triple Switch!
That's gonna be the title for my new movie. . . Or the managerial move I make that loses my kid the little league championship game. . . Or a utility node in Maya.
The triple switch is such a weird node. . . Not sure I've ever seen anyone use it in production. But in certain circumstances it can be useful and on rare occasions can be very handy indeed.
Basically the idea of the node is that you can create a geometry-specific attribute of a single material. So, fer example, you could put one shader on 100 objects and have, say, the color be different for each object. Still using just one shader, mind you. . . the color is different for each object, but all the other attrs of the shaders behave as normal. Here's the vid about how that works.
Maya: Using the Triple Switch utility node from zeth willie on Vimeo.
It's kind of hard to imagine getting the most out of this node without some coding, since by definition the node becomes more useful the more stuff (and therefore connections) you have in your scene. . . Here's the code I used to set up the basic random color thingy from the video. To use it, hook the triple switch up to the material, apply the material shader to the objects. Select the TS, then the objects and run the code. Obviously, if you want different results (which you should, probably) then adjust whatever parameters and values you'd like:
EDIT: Here's the code I used to create the distance setup. Seems a bit wonky to do things this way, but it more or less works . . . The point here being that since you can use an attr to drive the triple switch, you can control that attr with any of the usual (or unusual means) you control attrs in Maya. For this one you'll need to create a ".tightenFalloff" attr on the measure object first. (BTW, you actually don't need to drive an attr with the distance numbers, you could just plug them into the triple switch directly, but that's a little mysterious for anyone who might use this. The point, again, was simply to illustrate that you don't need colors to drive the triple switch):
The triple switch is such a weird node. . . Not sure I've ever seen anyone use it in production. But in certain circumstances it can be useful and on rare occasions can be very handy indeed.
Basically the idea of the node is that you can create a geometry-specific attribute of a single material. So, fer example, you could put one shader on 100 objects and have, say, the color be different for each object. Still using just one shader, mind you. . . the color is different for each object, but all the other attrs of the shaders behave as normal. Here's the vid about how that works.
Maya: Using the Triple Switch utility node from zeth willie on Vimeo.
It's kind of hard to imagine getting the most out of this node without some coding, since by definition the node becomes more useful the more stuff (and therefore connections) you have in your scene. . . Here's the code I used to set up the basic random color thingy from the video. To use it, hook the triple switch up to the material, apply the material shader to the objects. Select the TS, then the objects and run the code. Obviously, if you want different results (which you should, probably) then adjust whatever parameters and values you'd like:
//triple switch should already be created and connected to shader

//select triple then objects

string $sel[] = `ls -sl`;

int $sizeObj = size($sel);

string $triple = $sel[0];


for ($i=1; $i<$sizeObj; $i++) {

    string $me = $sel[$i];

    select -r $me;


    //these are the per object attrs we're adding

    addAttr -at "float" -k 1 -ln "redMult";

    addAttr -at "float" -k 1 -ln "greenMult";

    addAttr -at "float" -k 1 -ln "blueMult";


    //these are the random values for those attrs

    float $rRand = `rand .75 1.25`;

    float $gRand = `rand .75 1.25`;

    float $bRand = `rand .75 1.25`;


    //assign the values to the attrs

    setAttr ($me + ".redMult") $rRand;

    setAttr ($me + ".greenMult") $gRand;

    setAttr ($me + ".blueMult") $bRand;


    //connect the objects to the TS

    string $child[] = `listRelatives -c $me`;

    string $shape = $child[0];

    string $meShape = ($shape + ".instObjGroups[0]");


    connectAttr ($meShape) ($triple+".input["+($i-1)+"].inShape");


    //connect the attrs to the TS at the same index the obj is connected

    connectAttr ($me + ".redMult") ($triple+".input["+($i-1)+"].inComp1");

    connectAttr ($me + ".greenMult") ($triple+".input["+($i-1)+"].inComp2");

    connectAttr ($me + ".blueMult") ($triple+".input["+($i-1)+"].inComp3");

    }


}
EDIT: Here's the code I used to create the distance setup. Seems a bit wonky to do things this way, but it more or less works . . . The point here being that since you can use an attr to drive the triple switch, you can control that attr with any of the usual (or unusual means) you control attrs in Maya. For this one you'll need to create a ".tightenFalloff" attr on the measure object first. (BTW, you actually don't need to drive an attr with the distance numbers, you could just plug them into the triple switch directly, but that's a little mysterious for anyone who might use this. The point, again, was simply to illustrate that you don't need colors to drive the triple switch):
///////////////////////

//color by distance

//////////////////////

{

//triple switch should already be created and connected to shader

//select triple then measure object, then textured objects

string $sel[] = `ls -sl`;

int $sizeObj = size($sel);

string $triple = $sel[0];

string $mObject = $sel[1];


for ($i=2; $i<$sizeObj; $i++) {

    string $me = $sel[$i];

    string $meDist = $me + "Distance";

    select -r $me;

    addAttr -at "float" -min 0 -max 1 -k 1 -ln "distance";


    //create distance node

    shadingNode -asUtility distanceBetween -n $meDist;

    connectAttr ($me + ".worldMatrix") ($meDist + ".inMatrix1");

    connectAttr ($mObject + ".worldMatrix") ($meDist + ".inMatrix2");

    connectAttr ($me + ".rotatePivotTranslate") ($meDist + ".point1");

    connectAttr ($mObject + ".rotatePivotTranslate") ($meDist + ".point2");


    //connect the distance to a mult node

    shadingNode -asUtility multiplyDivide -n ($me+"mult");

    connectAttr ($mObject+".tightenFalloff") (($me+"mult")+".input1X");

    connectAttr ($meDist+".distance") (($me+"mult")+".input2X");


    //connect the dist node to the attr on the object

    connectAttr (($me+"mult")+".outputX") ($me+".distance");


    string $child[] = `listRelatives -c $me`;

    string $shape = $child[0];

    string $meShape = ($shape + ".instObjGroups[0]");


    connectAttr ($meShape) ($triple+".input["+($i-2)+"].inShape");


    connectAttr ($me + ".distance") ($triple+".input["+($i-2)+"].inComp1");

    connectAttr ($me + ".distance") ($triple+".input["+($i-2)+"].inComp2");

    connectAttr ($me + ".distance") ($triple+".input["+($i-2)+"].inComp3");

    }


}
Tuesday, November 08, 2011
Creating non-renderable "implicit" spheres, cones, cubes
Not sure how I didn't know about these until recently. The names sound so passive-aggressive. . .
Each of these commands basically creates a non-renderable object (sphere, cube, cone) that has a very basic shape node (no components) and a transform node. You can still go into the shape node and change color using the drawing overrides and all. Doubt I'll be using them all the time or anything, but cool to know they are there if ever you should need them.
createNode implicitSphere -n "name";

createNode implicitBox -n "name";

createNode implicitCone -n "name";
Each of these commands basically creates a non-renderable object (sphere, cube, cone) that has a very basic shape node (no components) and a transform node. You can still go into the shape node and change color using the drawing overrides and all. Doubt I'll be using them all the time or anything, but cool to know they are there if ever you should need them.
Friday, October 07, 2011
Dealing with smoothing in your character rigs
Was literally thinking about whether to include this topic in another vid and someone emailed me and asked me about this specifically. Weird!
This video sort of quickly goes through some ways to deal with how to include various smoothing levels in your rig, from lo poly proxy geo to highly smoothed for rendering.
Here's the code I use in the video:
1) for grabbing ALL polySmoothFace nodes in the scene and connecting them to your master control in the rig scene (note you should change any appropriate names, obviously, to ones you're using):
2) for changing the smooth state of any selected master control objects (probably best to use this as a mel button on your shelf, and of course change any names/values to what you want):
This video sort of quickly goes through some ways to deal with how to include various smoothing levels in your rig, from lo poly proxy geo to highly smoothed for rendering.
Here's the code I use in the video:
1) for grabbing ALL polySmoothFace nodes in the scene and connecting them to your master control in the rig scene (note you should change any appropriate names, obviously, to ones you're using):
{

string $smooths[] = `ls -type "polySmoothFace"`;

for ($each in $smooths){

    connectAttr master_CTRL.hiPolyLevel ($each + ".divisions");

    }

}
2) for changing the smooth state of any selected master control objects (probably best to use this as a mel button on your shelf, and of course change any names/values to what you want):
{

string $sel[] = `ls -sl`;

for ($each in $sel){

    setAttr ($each + ".loPoly") 1;

    setAttr ($each + ".hiPolyLevel") 0;

    }

}Wednesday, October 05, 2011
creating a nice clean distance node using "distanceBetween"
Here's another neat little node, called the "distanceBetween". As you might guess, it measures the distance between of two selected objects. What's nice about this is that you don't get the extra gunk that comes the measure tool, like locators and UI stuff, which one typically doesn't need in a rig.
The only tricky part here is that in a DAG hierarchy you can't really use the translate attributes as the measure inputs because those don't reflect world space distances. So you'll need to hook up one of the pivots for each object and then use the "world space" attributes for each object into the respective input matrices of the distance node. Huh? Just watch the video and I'll walk through it.
The basic code for the node itself is:
BTW, here's the code I used in the video for creating this distance node . . . You can just copy it into your script editor and make a quick mel button for it. I've added just a quick dummy check to make sure there are 2 tranforms selected.
The only tricky part here is that in a DAG hierarchy you can't really use the translate attributes as the measure inputs because those don't reflect world space distances. So you'll need to hook up one of the pivots for each object and then use the "world space" attributes for each object into the respective input matrices of the distance node. Huh? Just watch the video and I'll walk through it.
The basic code for the node itself is:
shadingNode -asUtility distanceBetween -n "name;BTW, here's the code I used in the video for creating this distance node . . . You can just copy it into your script editor and make a quick mel button for it. I've added just a quick dummy check to make sure there are 2 tranforms selected.
{

string $sel[] = `ls -sl -tr`;

if (`size($sel)` != 2){

    error "please select 2 transformable objects to measure";

    }

string $name = "distance";

string $dis = `shadingNode -asUtility distanceBetween -n $name`;

connectAttr ($sel[0] + ".worldMatrix") ($dis + ".inMatrix1");

connectAttr ($sel[1] + ".worldMatrix") ($dis + ".inMatrix2");

connectAttr ($sel[0] + ".rotatePivotTranslate") ($dis + ".point1");

connectAttr ($sel[1] + ".rotatePivotTranslate") ($dis + ".point2");

}Friday, September 02, 2011
Swapping out rotation orders under an animation
Not an everyday thing to use, but useful when something like this crops up. . .
Rotation orders are always kind of important, but on certain animations it can be pretty necessary to manage them correctly (I'll try to do a separate post on rotation orders in general later).
I was just on a commercial recently where I was tasked with animating a couple of leaves fluttering into position. Somehow I got something sideways in one of the leaves and already had a fairly decent animation base down before I realized it. One leaf was correctly oriented in the rig to point in X and the other got perpendicular in Z. I built the entire rig for both as though they were pointing in X with the default rotate order (XYZ) and thus had two slightly different behaviors. I couldn't get a clean rotation down the axis of the leaf that was oriented in Z because the rotation order was incorrect (should have been ZYX, if I remember correctly). The general rule of thumb is that you usually want any channel that you'd like clean to be FIRST in the rotate order (though technically, that means it rotates last). Anyways, that's a fairly easy fix in the rig, just had to go back to my working version and change the rotate orders of the control structure elements, publish it back to the master version and done.
BUT, since I'd already animated a bunch of stuff, swapping the rotation orders under the published version of the rig would mess all the rotations up. Didn't want to have to match each keyframe by eye, but there seemed to be no numerical way to match stuff up. I was banging my head against the wall when I asked Brad Friedman, who's a really smart pipeline TD at Method and he told me unequivocally, "nope. Can't be done mathematically". My next thought was to try to go to a key, orient constrain the object, delete the constraint, key it and repeat. The evil trick, though, is that this isn't even doable by hand (except to go through and key by eye), because even if you were to try and constrain then delete the constraint, then key the value, it would blow away any keys you previously had. So you can do that once, but not multiple times over the length of the animation. Ugh.
So I came up with a quick little script (with a python assist from Brendon, who's another smart pipeline TD there).
Basically the idea is this, you have a scene with your incorrect rotate orders already animated. Import your new rig with the correct rotation orders. Select the animated original, then the new rig, then run the script. It will find any keyframes for rotation and translation. For each keyframe, it will point and orient constrain the new rig to the old rig and store the translate and rotate values of the NEW rig (which are the numbers, at least rotation, that aren't derivable from the orig data) and then, once it's stored them all, go back and key those stored values at the correct frame for your new object. Finally, it will run an Euler filter on the lot of the new curves (I noticed some rotations can get a bit weird without it).
Not perfect but serviceable and fast. Which is good cuz it was my mess up in building the rig that started the whole problem!
So here's the script:
zbw_swapRotateOrder.py.zip (rt-click,save as)
To use this, drop it in your version/scripts folder (or wherever else you stash your python scripts) and then in Maya, select the original object, then the new rotation order rig and type:
Once you've imported the script, you just need the second line to run the function thereafter, I believe. (I can write the python scripts fairly simply, but using them in Maya still seems like a pain to me)
Rotation orders are always kind of important, but on certain animations it can be pretty necessary to manage them correctly (I'll try to do a separate post on rotation orders in general later).
I was just on a commercial recently where I was tasked with animating a couple of leaves fluttering into position. Somehow I got something sideways in one of the leaves and already had a fairly decent animation base down before I realized it. One leaf was correctly oriented in the rig to point in X and the other got perpendicular in Z. I built the entire rig for both as though they were pointing in X with the default rotate order (XYZ) and thus had two slightly different behaviors. I couldn't get a clean rotation down the axis of the leaf that was oriented in Z because the rotation order was incorrect (should have been ZYX, if I remember correctly). The general rule of thumb is that you usually want any channel that you'd like clean to be FIRST in the rotate order (though technically, that means it rotates last). Anyways, that's a fairly easy fix in the rig, just had to go back to my working version and change the rotate orders of the control structure elements, publish it back to the master version and done.
BUT, since I'd already animated a bunch of stuff, swapping the rotation orders under the published version of the rig would mess all the rotations up. Didn't want to have to match each keyframe by eye, but there seemed to be no numerical way to match stuff up. I was banging my head against the wall when I asked Brad Friedman, who's a really smart pipeline TD at Method and he told me unequivocally, "nope. Can't be done mathematically". My next thought was to try to go to a key, orient constrain the object, delete the constraint, key it and repeat. The evil trick, though, is that this isn't even doable by hand (except to go through and key by eye), because even if you were to try and constrain then delete the constraint, then key the value, it would blow away any keys you previously had. So you can do that once, but not multiple times over the length of the animation. Ugh.
So I came up with a quick little script (with a python assist from Brendon, who's another smart pipeline TD there).
Basically the idea is this, you have a scene with your incorrect rotate orders already animated. Import your new rig with the correct rotation orders. Select the animated original, then the new rig, then run the script. It will find any keyframes for rotation and translation. For each keyframe, it will point and orient constrain the new rig to the old rig and store the translate and rotate values of the NEW rig (which are the numbers, at least rotation, that aren't derivable from the orig data) and then, once it's stored them all, go back and key those stored values at the correct frame for your new object. Finally, it will run an Euler filter on the lot of the new curves (I noticed some rotations can get a bit weird without it).
Not perfect but serviceable and fast. Which is good cuz it was my mess up in building the rig that started the whole problem!
So here's the script:
zbw_swapRotateOrder.py.zip (rt-click,save as)
To use this, drop it in your version/scripts folder (or wherever else you stash your python scripts) and then in Maya, select the original object, then the new rotation order rig and type:
import zbw_swapRotateOrder

zbw_swapRotateOrder.swapOrder()
Once you've imported the script, you just need the second line to run the function thereafter, I believe. (I can write the python scripts fairly simply, but using them in Maya still seems like a pain to me)
Tuesday, August 09, 2011
A little script for those big scenes . . .
A little script from a job with a HUGE environment (basically a city made to scale in cm units. Good grief). Just to help get things moving more quickly I threw this together. The cameras layouts were set up and we had to throw the characters into the scene, but when we referenced them, they came in at the origin which might be 10's of thousands of units away from the camera position.
So to ballpark things I made this script. . . Really simple actually, select your camera, enter a distance and hit "create Locator" which will create a locator at the specified distance in front of the camera. (Or you could make your own, though that kind of defeats the purpose) You can then move the locator around if you're not happy with the distance or undo and try again with a new distance.
 Then go the outliner and select the locator you want, then the group or object you want to place at the locator and hit snap. The script will just snap the position of the object to the locator in front of the camera. . .
Not a big deal, just something to ease the pain of trying to pull things around a scene that's way too big for it own good :)
HERE is the script if you want to have a go. (rt click and save as)
So to ballpark things I made this script. . . Really simple actually, select your camera, enter a distance and hit "create Locator" which will create a locator at the specified distance in front of the camera. (Or you could make your own, though that kind of defeats the purpose) You can then move the locator around if you're not happy with the distance or undo and try again with a new distance.

Not a big deal, just something to ease the pain of trying to pull things around a scene that's way too big for it own good :)
HERE is the script if you want to have a go. (rt click and save as)
Monday, August 08, 2011
Follow up on corrective shapes for Maya 2011 . . .
Sorry for the lack of posts, been pretty busy (which one can never complain about these days, though I try). Seems like this will be the M.O. generally speaking. . . Nothing for a while, then a flurry of stuff.
Well, get ready to be flurried on, cause I've got a bunch of stuff to throw up here in the next few days while I have moment :) Let's start with some follow up material:
Did a post on pose space deformation, or corrective shapes, a little while ago. Here's an update of some scripts, etc that may work for you (mileage may vary) in later versions (post 2010). I haven't had much time to play with these unfortunately, but if I come up with anything else, I'll let you know . . .
extract deltas from brave rabbit playground
This works nicely . . . but be careful about the scaling and transforms of your orig mesh. Seems like the script is having trouble recognizing at least any scale values in the bound mesh (so you'll get a tiny or big blendShape mesh as your result if there are scale values other than 1 in the orig mesh. Which there shouldn't be, but still . . .)
http://www.chadvernon.com/blog/resources/cvshapeinverter/ - cvshape inverter from Chad Vernon
Watch some of this guys videos. Seriously off the hook skills. This plug in is giving me some trouble though. Seems from the comments like some people have gotten this working. Not me. Might be my stupidity re: how python stuff works, might be something to do trying it on my Mac, but while I'm seeing the plug-in, I'm not getting the script version to work, failing on "import" (tried this on a PC at my last gig but didn't have access to the plug-ins folder to install everything. But it seemed like it was trying to work than on my Mac. Hmmm).
http://www.djx.com.au/blog/downloads/ - look for "poseDeformer" towards the bottom
This seems pretty interesting and certainly has lots of options . . . check out a walkthrough of features here. Seems like it was written a while back and is just being updated for newer versions of Maya. But also seems like overkill in most instances (at least for me) and because of all the bells and whistles, seems like it may require ALL the artists on the team to have it installed (at least those that need to see the deformation at the rig level). Can't even be fussed to install this :p
Well, get ready to be flurried on, cause I've got a bunch of stuff to throw up here in the next few days while I have moment :) Let's start with some follow up material:
Did a post on pose space deformation, or corrective shapes, a little while ago. Here's an update of some scripts, etc that may work for you (mileage may vary) in later versions (post 2010). I haven't had much time to play with these unfortunately, but if I come up with anything else, I'll let you know . . .
extract deltas from brave rabbit playground
This works nicely . . . but be careful about the scaling and transforms of your orig mesh. Seems like the script is having trouble recognizing at least any scale values in the bound mesh (so you'll get a tiny or big blendShape mesh as your result if there are scale values other than 1 in the orig mesh. Which there shouldn't be, but still . . .)
http://www.chadvernon.com/blog/resources/cvshapeinverter/ - cvshape inverter from Chad Vernon
Watch some of this guys videos. Seriously off the hook skills. This plug in is giving me some trouble though. Seems from the comments like some people have gotten this working. Not me. Might be my stupidity re: how python stuff works, might be something to do trying it on my Mac, but while I'm seeing the plug-in, I'm not getting the script version to work, failing on "import" (tried this on a PC at my last gig but didn't have access to the plug-ins folder to install everything. But it seemed like it was trying to work than on my Mac. Hmmm).
http://www.djx.com.au/blog/downloads/ - look for "poseDeformer" towards the bottom
This seems pretty interesting and certainly has lots of options . . . check out a walkthrough of features here. Seems like it was written a while back and is just being updated for newer versions of Maya. But also seems like overkill in most instances (at least for me) and because of all the bells and whistles, seems like it may require ALL the artists on the team to have it installed (at least those that need to see the deformation at the rig level). Can't even be fussed to install this :p
Saturday, April 02, 2011
scripting your "bind" joints into a Quick Select Set
As I mentioned in the videos in the previous post, here is the basic idea of how you'd create a Quick Select Set from your "_BIND_" joints. (thought I'd break it out into a separate post to make it easier to read) . . .
(it's MEL, btw)
The weird bit of that is the syntax for creating a QSS (sets -text "gCharacterSet" etc). Not sure what that's about . . .
You'll have to change stuff for your own setup (the name you're looking for), but otherwise it's pretty straightforward. It looks for joints, then within that selection, looks for the name you've got (in my case "_BIND_") and adds those to a QSS called BindJoints. I find the QSS a bit easier to use for this purpose than a regular set.
Now if I want a selection that isn't easily grab-able (like in the ribbon spine) I can just grab the QSS from the "Edit" --- "QuickSelectSets" menu and then grab my geo and off I go to binding-world. I'll usually end up adding some code to remove any joint that I don't end up wanting in the bind afterwards (though I try to name things with this in mind, so the end joints on toes, for example, WON'T get the "_BIND_" added to their name, as I don't need them bound.) I'll just add this code to the tail end of any rig I'm scripting (or as a stand alone chunk of code for a custom built rig) and the QSS will be there waiting for me every time I build the rig or want to bind/unbind. Definitely makes things faster to test things out in your rigs. Hope this helps!
{

string $bind[] = `ls -type joint "*_BIND_*"`;


sets -text "gCharacterSet" -name BindJoints;


for ($obj in $bind) {

    sets -edit -forceElement BindJoints $obj;

    }

}
(it's MEL, btw)
The weird bit of that is the syntax for creating a QSS (sets -text "gCharacterSet" etc). Not sure what that's about . . .
You'll have to change stuff for your own setup (the name you're looking for), but otherwise it's pretty straightforward. It looks for joints, then within that selection, looks for the name you've got (in my case "_BIND_") and adds those to a QSS called BindJoints. I find the QSS a bit easier to use for this purpose than a regular set.
Now if I want a selection that isn't easily grab-able (like in the ribbon spine) I can just grab the QSS from the "Edit" --- "QuickSelectSets" menu and then grab my geo and off I go to binding-world. I'll usually end up adding some code to remove any joint that I don't end up wanting in the bind afterwards (though I try to name things with this in mind, so the end joints on toes, for example, WON'T get the "_BIND_" added to their name, as I don't need them bound.) I'll just add this code to the tail end of any rig I'm scripting (or as a stand alone chunk of code for a custom built rig) and the QSS will be there waiting for me every time I build the rig or want to bind/unbind. Definitely makes things faster to test things out in your rigs. Hope this helps!
Subscribe to:
Posts (Atom)